


The Tensorflow data API tf.data is a well-known tool used to build complex Machine Learning (ML) input-data pipelines when training a model with Tensorflow. It is a very useful and powerful tool when applying transformations to a whole dataset for example.
In this tutorial, we will show how to use Hub instead of tf.data for several cases:
How to load a common dataset: CIFAR10
How to create dataset from directory: Flower Photos dataset
How to conduct Data Augmentation
How to work with segmentation datasets
Before starting, we need to install and import the packages required for this tutorial:
!pip install hub==2.0.7 # restart runtime after this
Imports:
import hub
import tensorflow as tf
import pathlib
import os
import matplotlib.pyplot as plt
import numpy as np
from PIL import Image
from tqdm import tqdm
1) How to load the CIFAR10 dataset
Let’s start with a simple task: loading the CIFAR10 dataset. CIFAR10 dataset comprises 60000 32x32 colour images in 10 classes, and there are 6000 images per class. In total, there are 50000 training images and 10000 test images in the CIFAR10 dataset.
with tf.data:
train, test = tf.keras.datasets.cifar10.load_data()

images, labels = train
images = images/255 # normalize

dataset_cifar10_tf_data = tf.data.Dataset.from_tensor_slices((images, labels))
➡️ <TensorSliceDataset shapes: ((32, 32, 3), (1,)), types: (tf.float64, tf.uint8)>
with Hub:
ds_cifar10_hub = hub.load('hub://activeloop/cifar10-train')

  def to_model_fit(item):
      x = item['images']/255 # normalize
      y = item['labels']
      return (x, y)

ds_cifar10_hub_tf = ds_cifar10_hub.tensorflow()
ds_cifar10_hub_tf = ds_cifar10_hub_tf.map(lambda x: to_model_fit(x))
➡️ <MapDataset shapes: ((32, 32, 3), (1,)), types: (tf.float32, tf.uint32)>
2) How to create dataset from directory: Flower dataset
We are using the Flower Photos dataset from Kaggle to demonstrate how to create a Tensorflow dataset from a local directory.
We first download the Flower Photos dataset:
!export KAGGLE_USERNAME="xxxxx" && export KAGGLE_KEY="xxxxx" && kaggle datasets download -d batoolabbas91/flower-photos-by-the-tensorflow-team && unzip -n flower-photos-by-the-tensorflow-team.zip
We need to take a look at what we have in this folder:

Now we can gather more information:
dataset_flowers_path = 'flower_photos'

from imutils import paths
files_list = sorted(list(paths.list_images(dataset_flowers_path)))
classes_flowers = sorted(os.listdir(dataset_flowers_path))

print(f'There are {len(classes_flowers)} classes of flowers in the dataset" {classes_flowers}')
➡️ There are 6 classes of flowers in the dataset” [‘LICENSE.txt’, ‘daisy’, ‘dandelion’, ‘roses’, ‘sunflowers’, ‘tulips’]
This is incorrect, we do not have 6 classes but 5 classes, so let’s fix this:
# Removing the 'LICENSE.txt'
classes_flowers.remove('LICENSE.txt')
print(f'There are {len(classes_flowers)} classes of flowers in the dataset" {classes_flowers}')
➡️ There are 5 classes of flowers in the dataset” [‘daisy’, ‘dandelion’, ‘roses’, ‘sunflowers’, ‘tulips’]
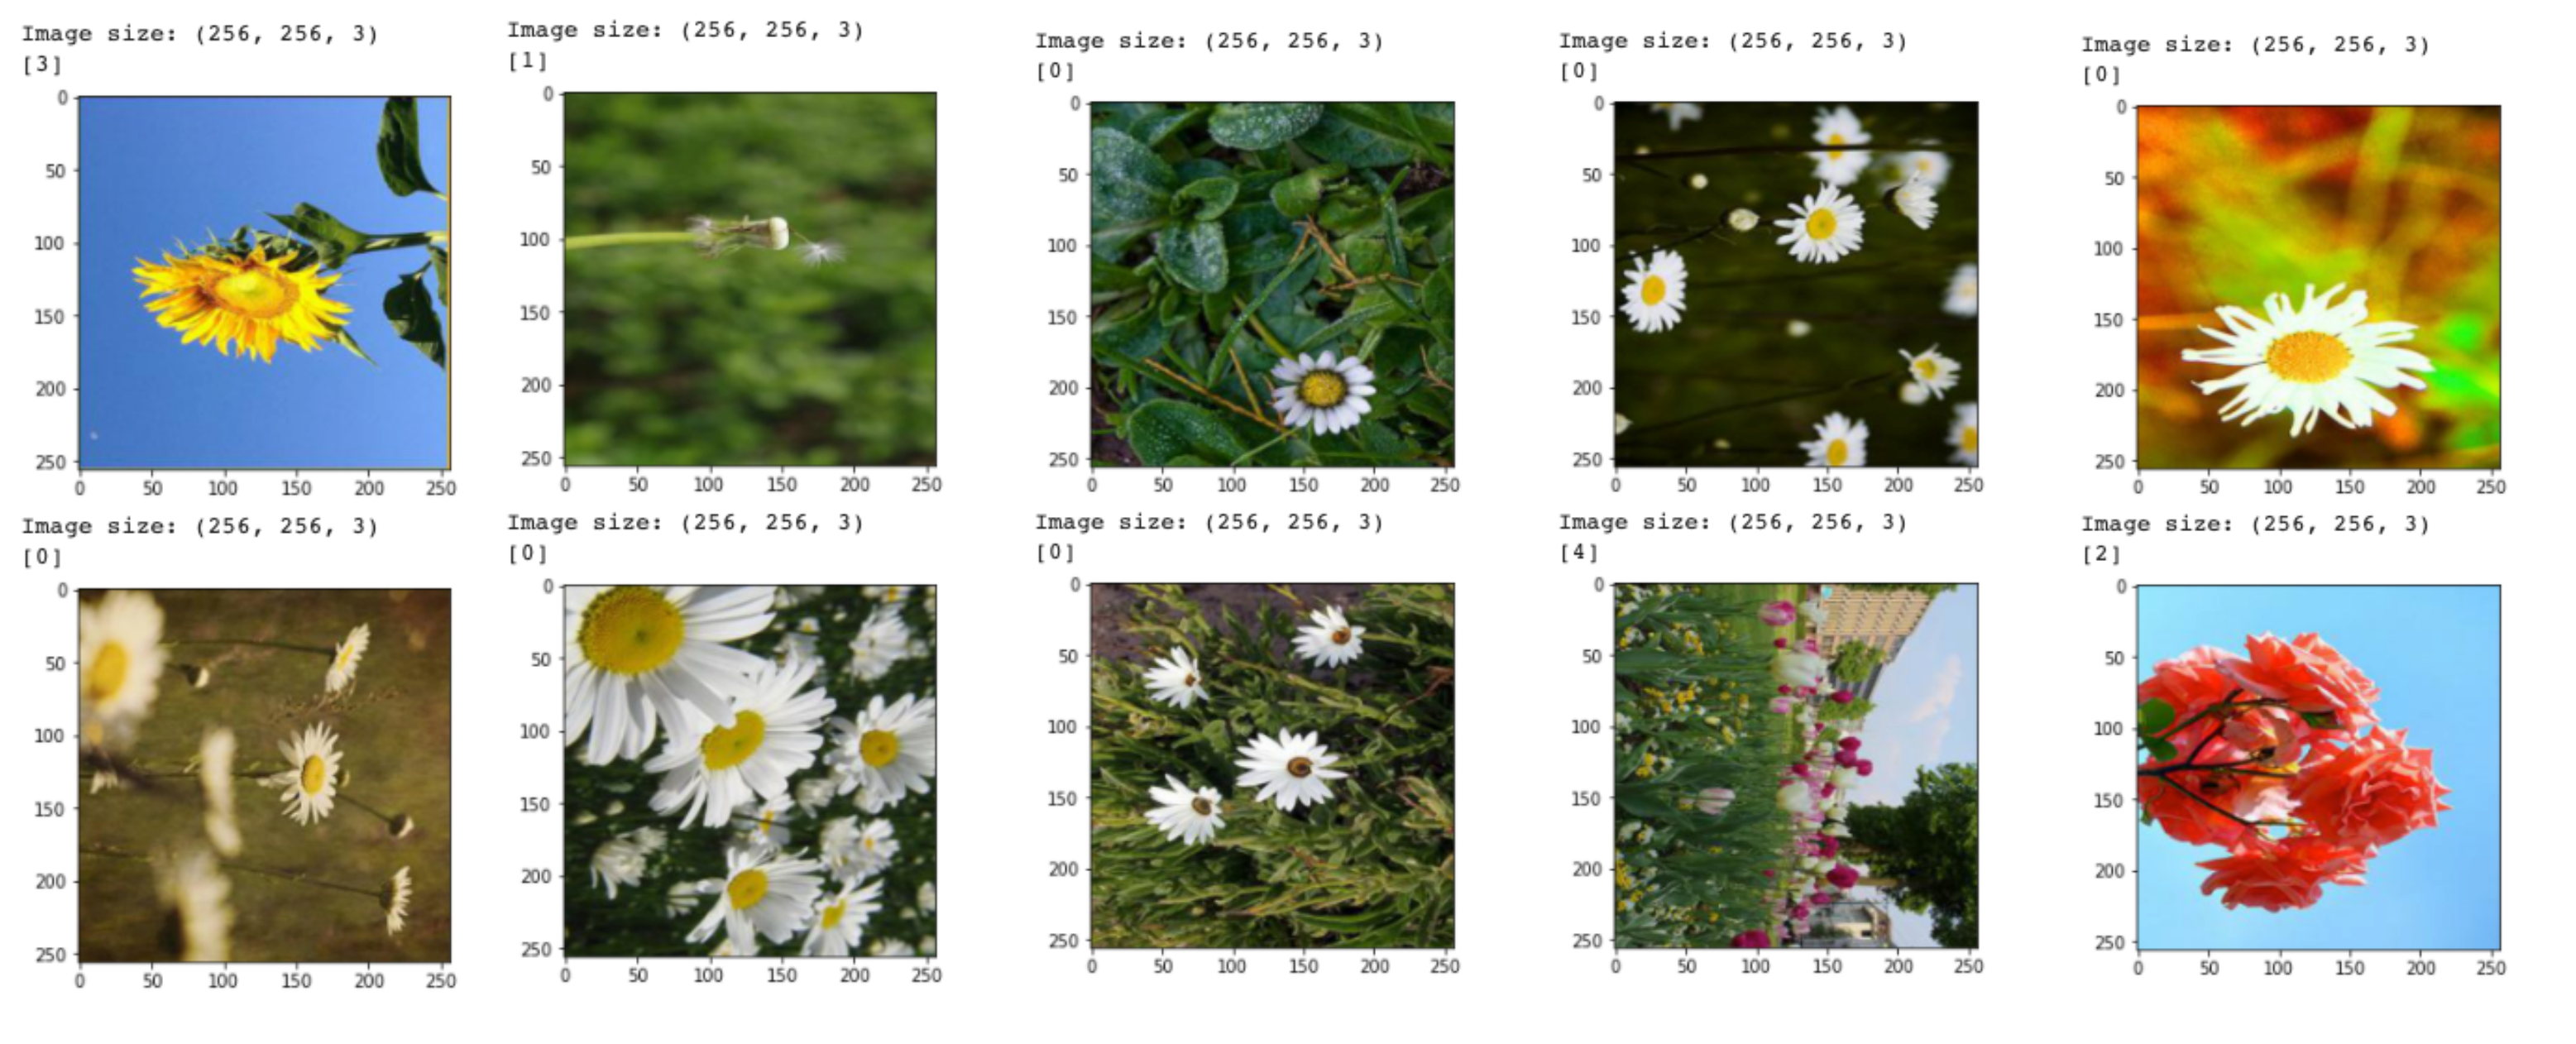
That’s better! Now let’s take a look at some of the images:
for i in range(4):
  image = Image.open(files_list[i])
  image_size = image.size
  print(image_size)
  image.show()
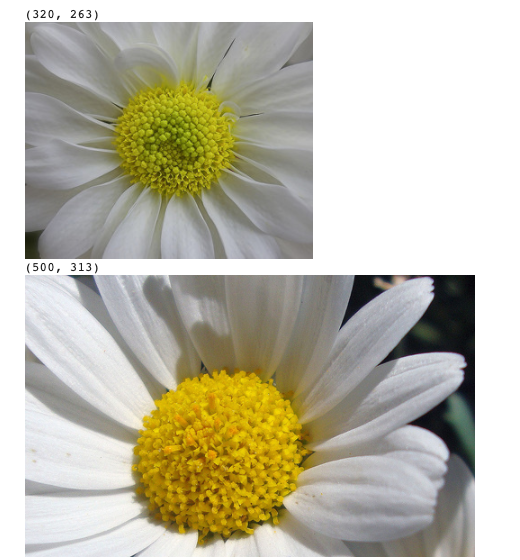
 dataset — Image by author](https://cdn-images-1.medium.com/max/2000/1*JZVkyQUULJQ9gvWpEwEGnw.png)
We can see that the images all have different sizes, so we need to keep this in mind for the rest of our coding.
- with tf.data:
We use the list files_list defined previously to create a Tensorflow dataset ds_flowers_tf_data:
ds_flowers_tf_data = tf.data.Dataset.from_tensor_slices(files_list)
We then implement a function parse_image that takes the path to the file, reads the image, get the label, and returns the normalized and resized image (since we saw that all the images have different sizes so we choose to use resize_size=(256,256))and the encoded label:
def parse_image(file_name):
  # read the image, decode it, resize it, and normalize it
  image = tf.io.read_file(file_name)
  image = tf.image.decode_jpeg(image, channels=3)
  image = tf.image.resize(image, resize_size) / 255.0

  # Found the label and encode it
  label = tf.strings.split(file_name, os.path.sep)[-2]
  one_hot = label == classes_flowers
  encoded_label = tf.argmax(one_hot)

  # return the image and the integer encoded label
  return (image, encoded_label)
Now we can see this function to map the file paths to the image/label pairs and apply it to ds_flowers_tf_data, that we then batch (batch_size=10), shuffle using a common seed shuffle_common_seed and prefetch:
ds_flowers_tf_data = (ds_flowers_tf_data
                      # Calling parse_image
                      .map(parse_image, num_parallel_calls=tf.data.AUTOTUNE)
                      .batch(batch_size)
                      .shuffle(len(ds_flowers_tf_data), seed=shuffle_common_seed)
                      .prefetch(tf.data.AUTOTUNE))
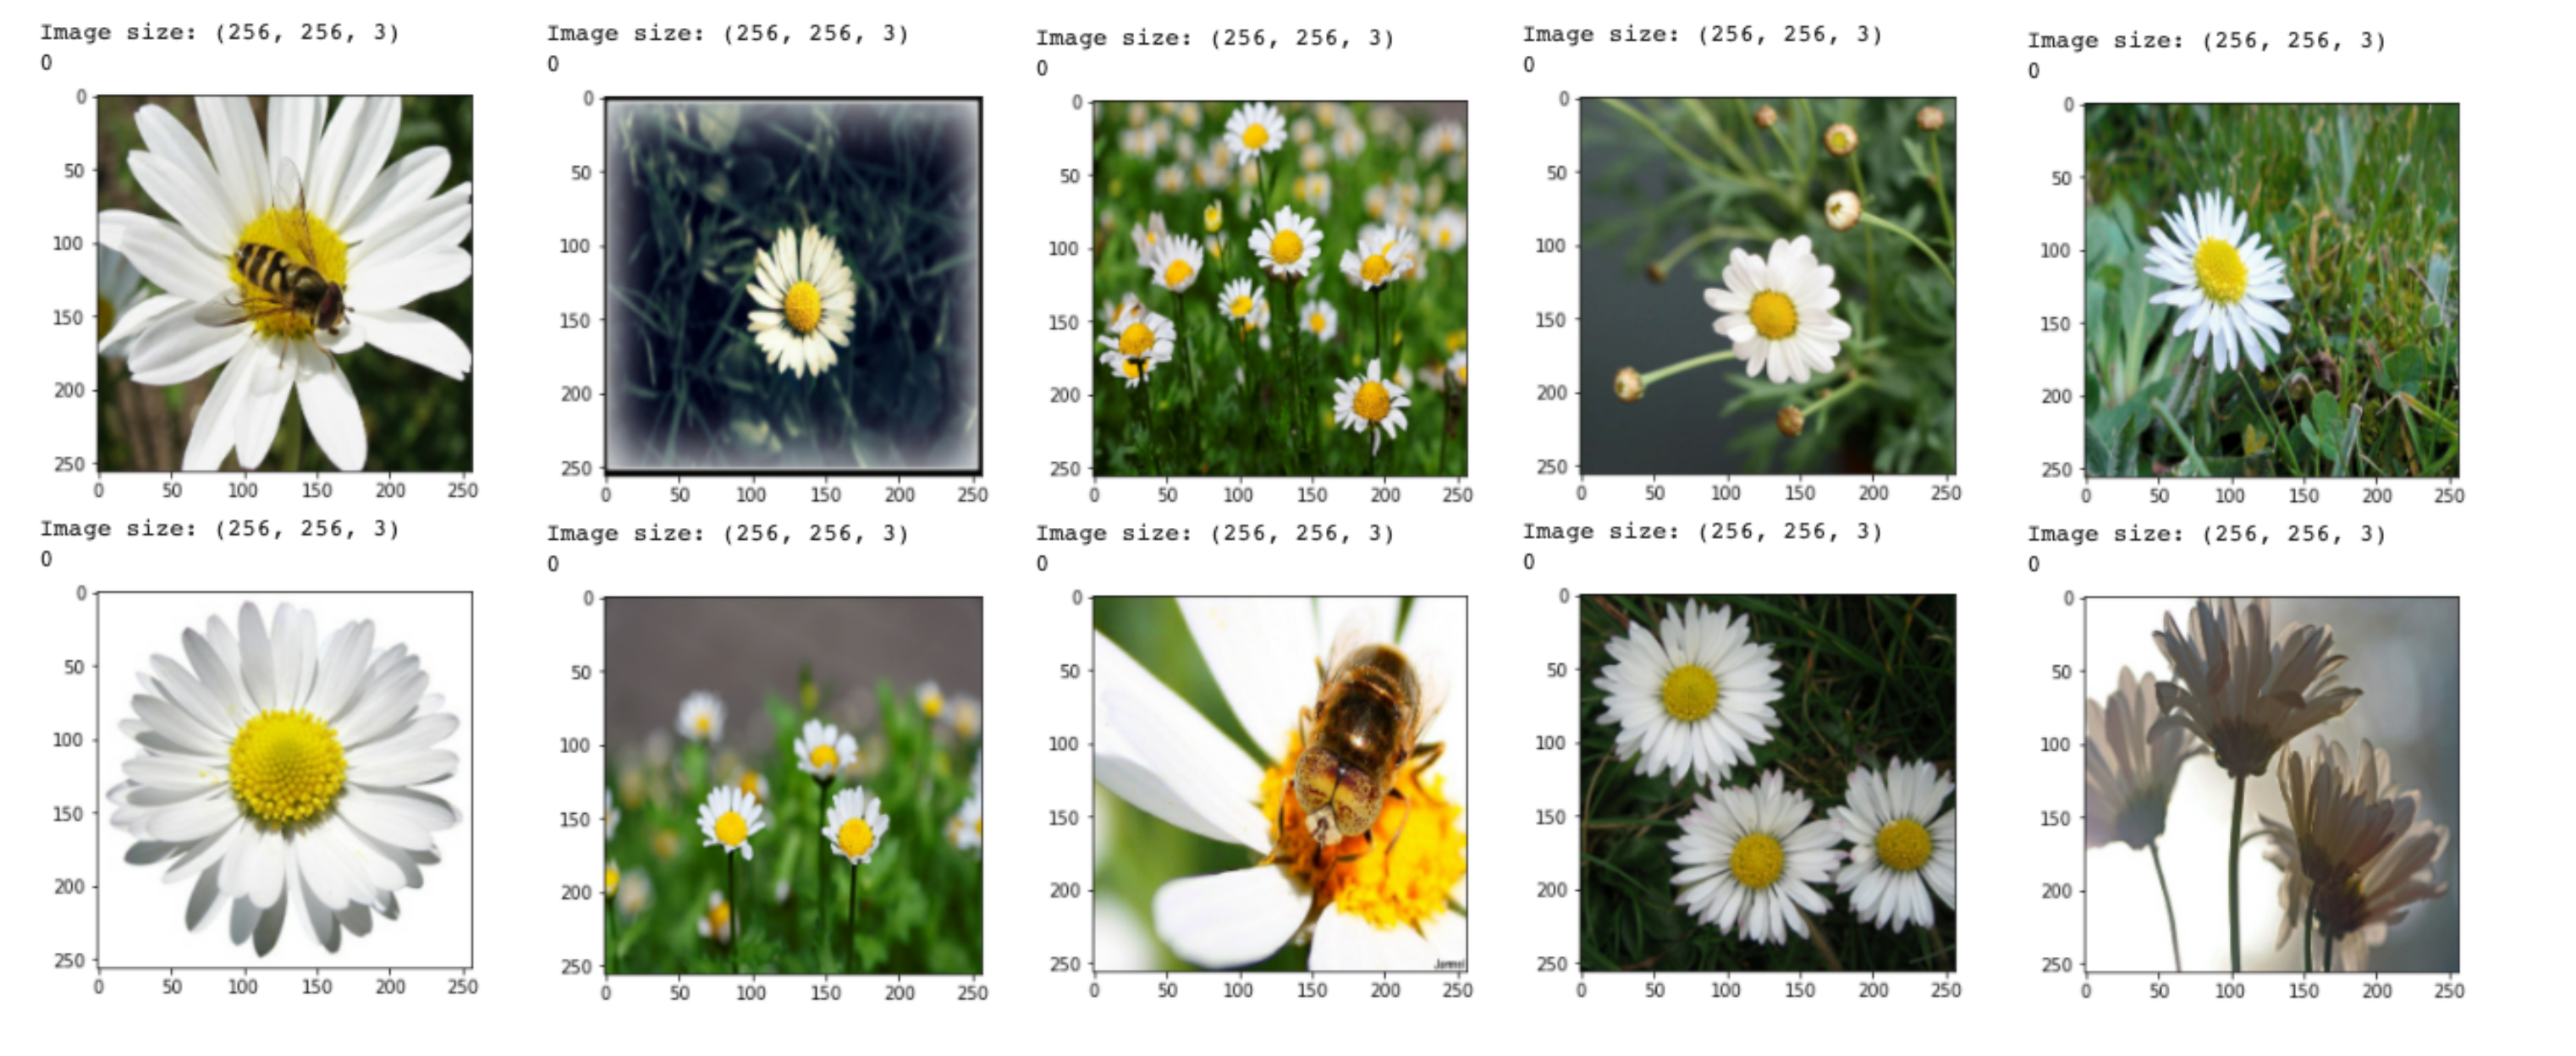
We implement a function called visualize_img_label_in_first_batch_TF_ds that takes as inputs a batched dataset ds along with the batch_size used and displays the image, its shape and its label:
def visualize_img_label_in_first_batch_TF_ds(ds, batch_size):
  for image, label in ds:
    for b in range(batch_size):
      print(f'Image size: {image.numpy()[b].shape}')
      print(label.numpy()[b])
      plt.imshow(image.numpy()[b])
      plt.show()
    break
Now we can use this function on the batched dataset ds_flowers_tf_data we created with tf.data:
visualize_img_label_in_first_batch_TF_ds(ds_flowers_tf_data, batch_size)
- with Hub: Now we want to do the exact same thing but using Hub instead of tf.data. So we still want to be able to process the path to the images, read them, get their label, and returns the normalized and resized images (
resize_size=(256,256))and the encoded labels.
First, we create the Hub dataset structure using the same list files_list as we did for the tf.data dataset and using the classes_flowers collected previously:
with hub.empty('./flowers_hub') as ds_flowers_hub:
    # Create the tensors with names of your choice.
    ds_flowers_hub.create_tensor('images', htype = 'image', sample_compression = 'jpg')
    ds_flowers_hub.create_tensor('labels', htype = 'class_label', class_names = classes_flowers)

    # Iterate through the files and append to hub dataset
    for file in tqdm(files_list):
        label_text = os.path.basename(os.path.dirname(file))
        label_num = classes_flowers.index(label_text)

        # Append to images tensor using hub.read
        ds_flowers_hub.images.append(hub.read(file))

        # Append to labels tensor
        ds_flowers_hub.labels.append(np.uint32(label_num))
We have created a Hub dataset called ds_flowers_hub that expects an image and a mask, both of types images.
We resize the dataset using the Hub transformation feature:
# Resize op[
@hub.compute
def resize(sample_in, sample_out, new_size):
    # Append the label and image to the output sample
    sample_out.labels.append(sample_in.labels.numpy())
    sample_out.images.append(np.array(Image.fromarray(sample_in.images.numpy()).resize(new_size)))

    return sample_out

# name resized dataset
path_dataset_resized = './flowers-dataset-resized-256x256'

# hub.like is used to create an empty dataset with the same tensor structure
ds_flowers_hub_resized = hub.like(path_dataset_resized, ds_flowers_hub, overwrite = True)

# Resize the dataset ds_flowers_hub that will be store in ds_flowers_hub_resized
resize(new_size=resize_size).eval(ds_flowers_hub, ds_flowers_hub_resized, num_workers = 2)
Now we can create the Tensorflow resized, batched, shuffled and prefetched dataset from ds_flowers_hub_resized:
def to_model_fit(item):
    x = item['images']/255 # normalize
    y = item['labels']
    return (x, y)

ds_flowers_hub_tf = ds_flowers_hub_resized.tensorflow()

ds_flowers_hub_tf =  (ds_flowers_hub_tf
                      # calling to_model_fit
                      .map(lambda x: to_model_fit(x))
                      .batch(batch_size)
                      .shuffle(len(ds_flowers_hub_resized), seed=shuffle_common_seed)
                      .prefetch(tf.data.AUTOTUNE))
Using the same function visualize_img_label_in_first_batch_TF_ds as previously, we visualize the first batch in the dataset ds_flowers_hub_tf which should be exactly the same as the images in the first batch of ds_flowers_tf_data because we are using the same shuffling seed (shuffle_common_seed) and we are using the same original dataset:
visualize_img_label_in_first_batch_TF_ds(ds_flowers_hub_tf, batch_size)
➡️ The images in the first batch of ds_flowers_hub_tf and ds_flowers_tf_data are indeed identical. 🌸
Finally, we can try to start a simple training with these datasets in order to check they are behaving correctly and can be used for an image classification training. First, we implement a function train_with_simple_CNN_function that defines the model to use (a very basic CNN), compiles the model and starts the training:
def train_with_simple_CNN_function(ds):
  model = tf.keras.Sequential([
      tf.keras.layers.InputLayer(input_shape=(resize_size[0], resize_size[1], 3)),
      tf.keras.layers.Conv2D(16,3,padding='same',activation='relu'),
      tf.keras.layers.MaxPooling2D(),
      tf.keras.layers.Conv2D(32,3,padding='same',activation='relu'),
      tf.keras.layers.MaxPooling2D(),
      tf.keras.layers.Conv2D(64,3,padding='same',activation='relu'),
      tf.keras.layers.MaxPooling2D(),
      tf.keras.layers.Dropout(0.2),
      tf.keras.layers.Flatten(),
      tf.keras.layers.Dense(128,activation='relu'),
     tf.keras. layers.Dense(len(classes_flowers), activation='softmax')
  ])

  # Compile the model, we are using the Adam optimizer, the SparseCategoricalCrossentropy loss
  # and SparseCategoricalAccuracy because our labels are not categorical
  model.compile(
      optimizer='adam',
      loss=tf.keras.losses.SparseCategoricalCrossentropy(),
      metrics=[tf.keras.metrics.SparseCategoricalAccuracy()]
  )

  # Start training over 2 epoch
  history = model.fit(ds, epochs = 2)
Results:
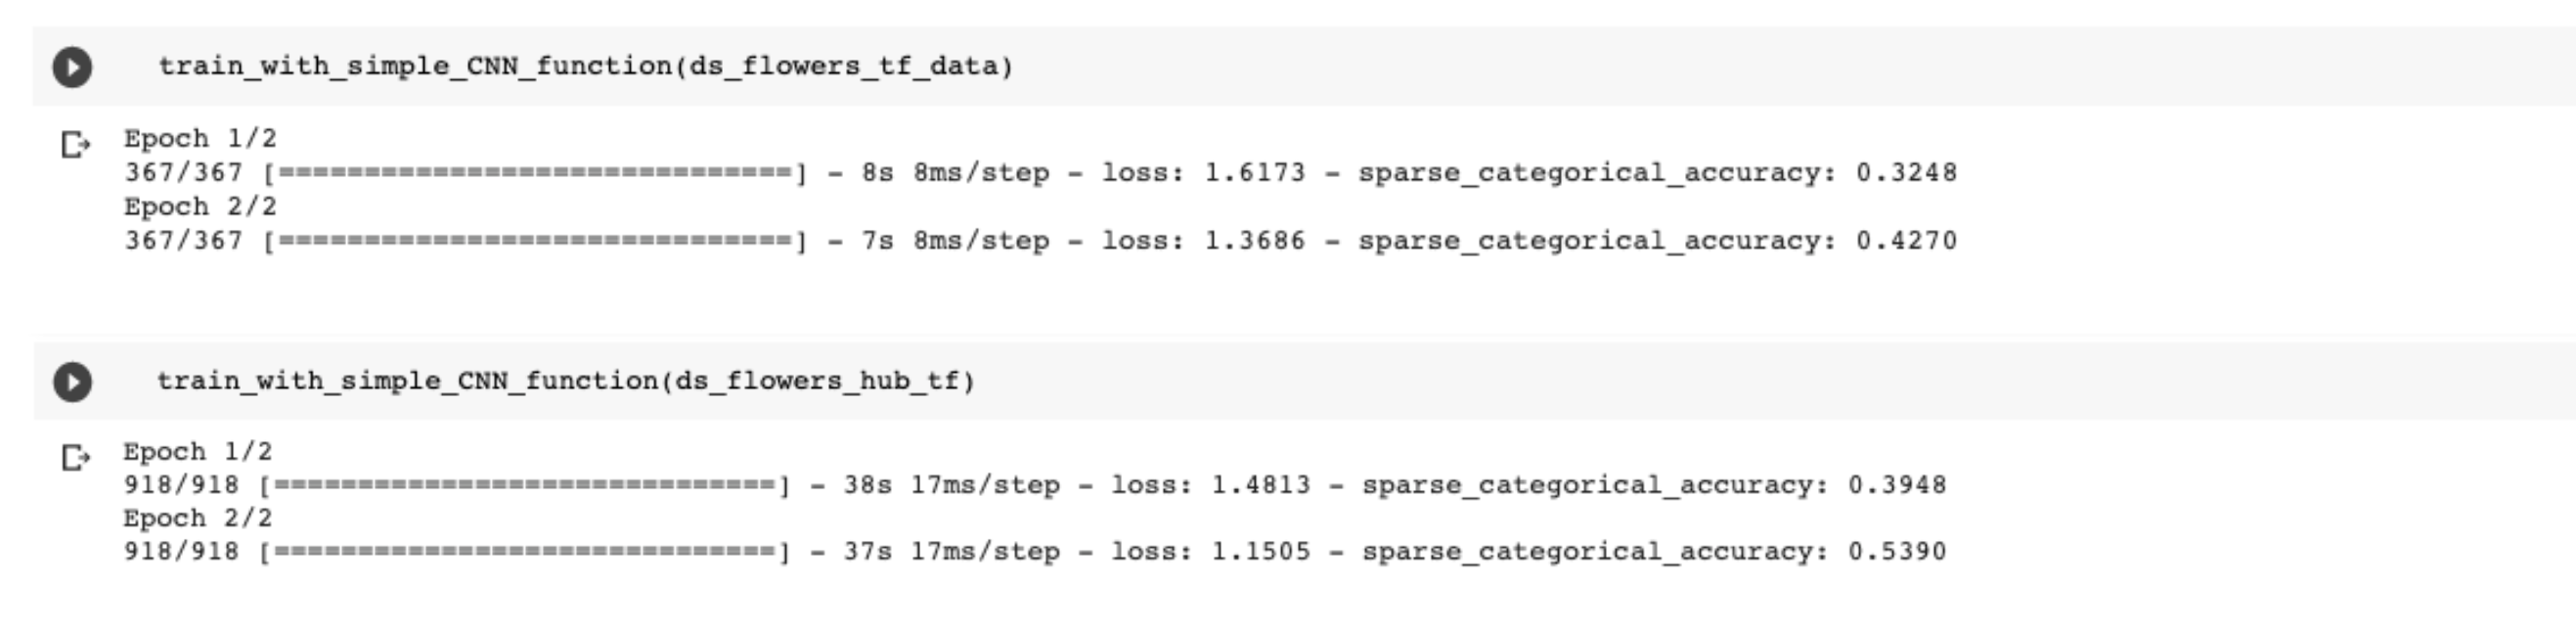
We see that the trainings go through the same numbers of iterations per epoch: 367 (which makes sense because len(dataset)=3670 and batch_size=10). In this tutorial, we do not care about the metrics, and only focus on whichever the dataset is usable in a training or not.
So, everything looks good! We can now work on training the best image classification model to differentiate the 5 classes of flowers we have with these datasets 🌻
 on [Unsplash](https://unsplash.com?utm_source=medium&utm_medium=referral)](https://cdn-images-1.medium.com/max/7776/0*_4M42XlZkXk2AO5W)
3) Data Augmentation 🌻🌻🌻
Data augmentation is a common method used to avoid overfitting of the model. Let’s see how we can implement it using tf.data and Hub:
- tf.data:
We use the same files_list and tf.data.Dataset.from_tensor_slices but this time, we add another mapping that will use the function augment_using_ops to augment our dataset:
def augment_using_ops(images, labels):
 images = tf.image.random_flip_left_right(images)
 images = tf.image.random_flip_up_down(images)
 images = tf.image.rot90(images)
 return (images, labels)

ds_flowers_tf_data = tf.data.Dataset.from_tensor_slices(files_list)

# We shuffle, cachhe, batched, augment and prefetch
ds_directory_tf_data_data_aug = (ds_flowers_tf_data
                  .map(parse_image, num_parallel_calls=tf.data.AUTOTUNE)
                  .shuffle(len(ds_flowers_tf_data), seed=shuffle_common_seed)
                  .cache()
                  .batch(batch_size)
                  .map(augment_using_ops, num_parallel_calls=tf.data.AUTOTUNE)
                  .prefetch(tf.data.AUTOTUNE)
)
Then we want to see if the augmentation was successful (we should have flipped and rotated images now:
visualize_img_label_in_first_batch_TF_ds(ds_directory_tf_data_data_aug, batch_size)
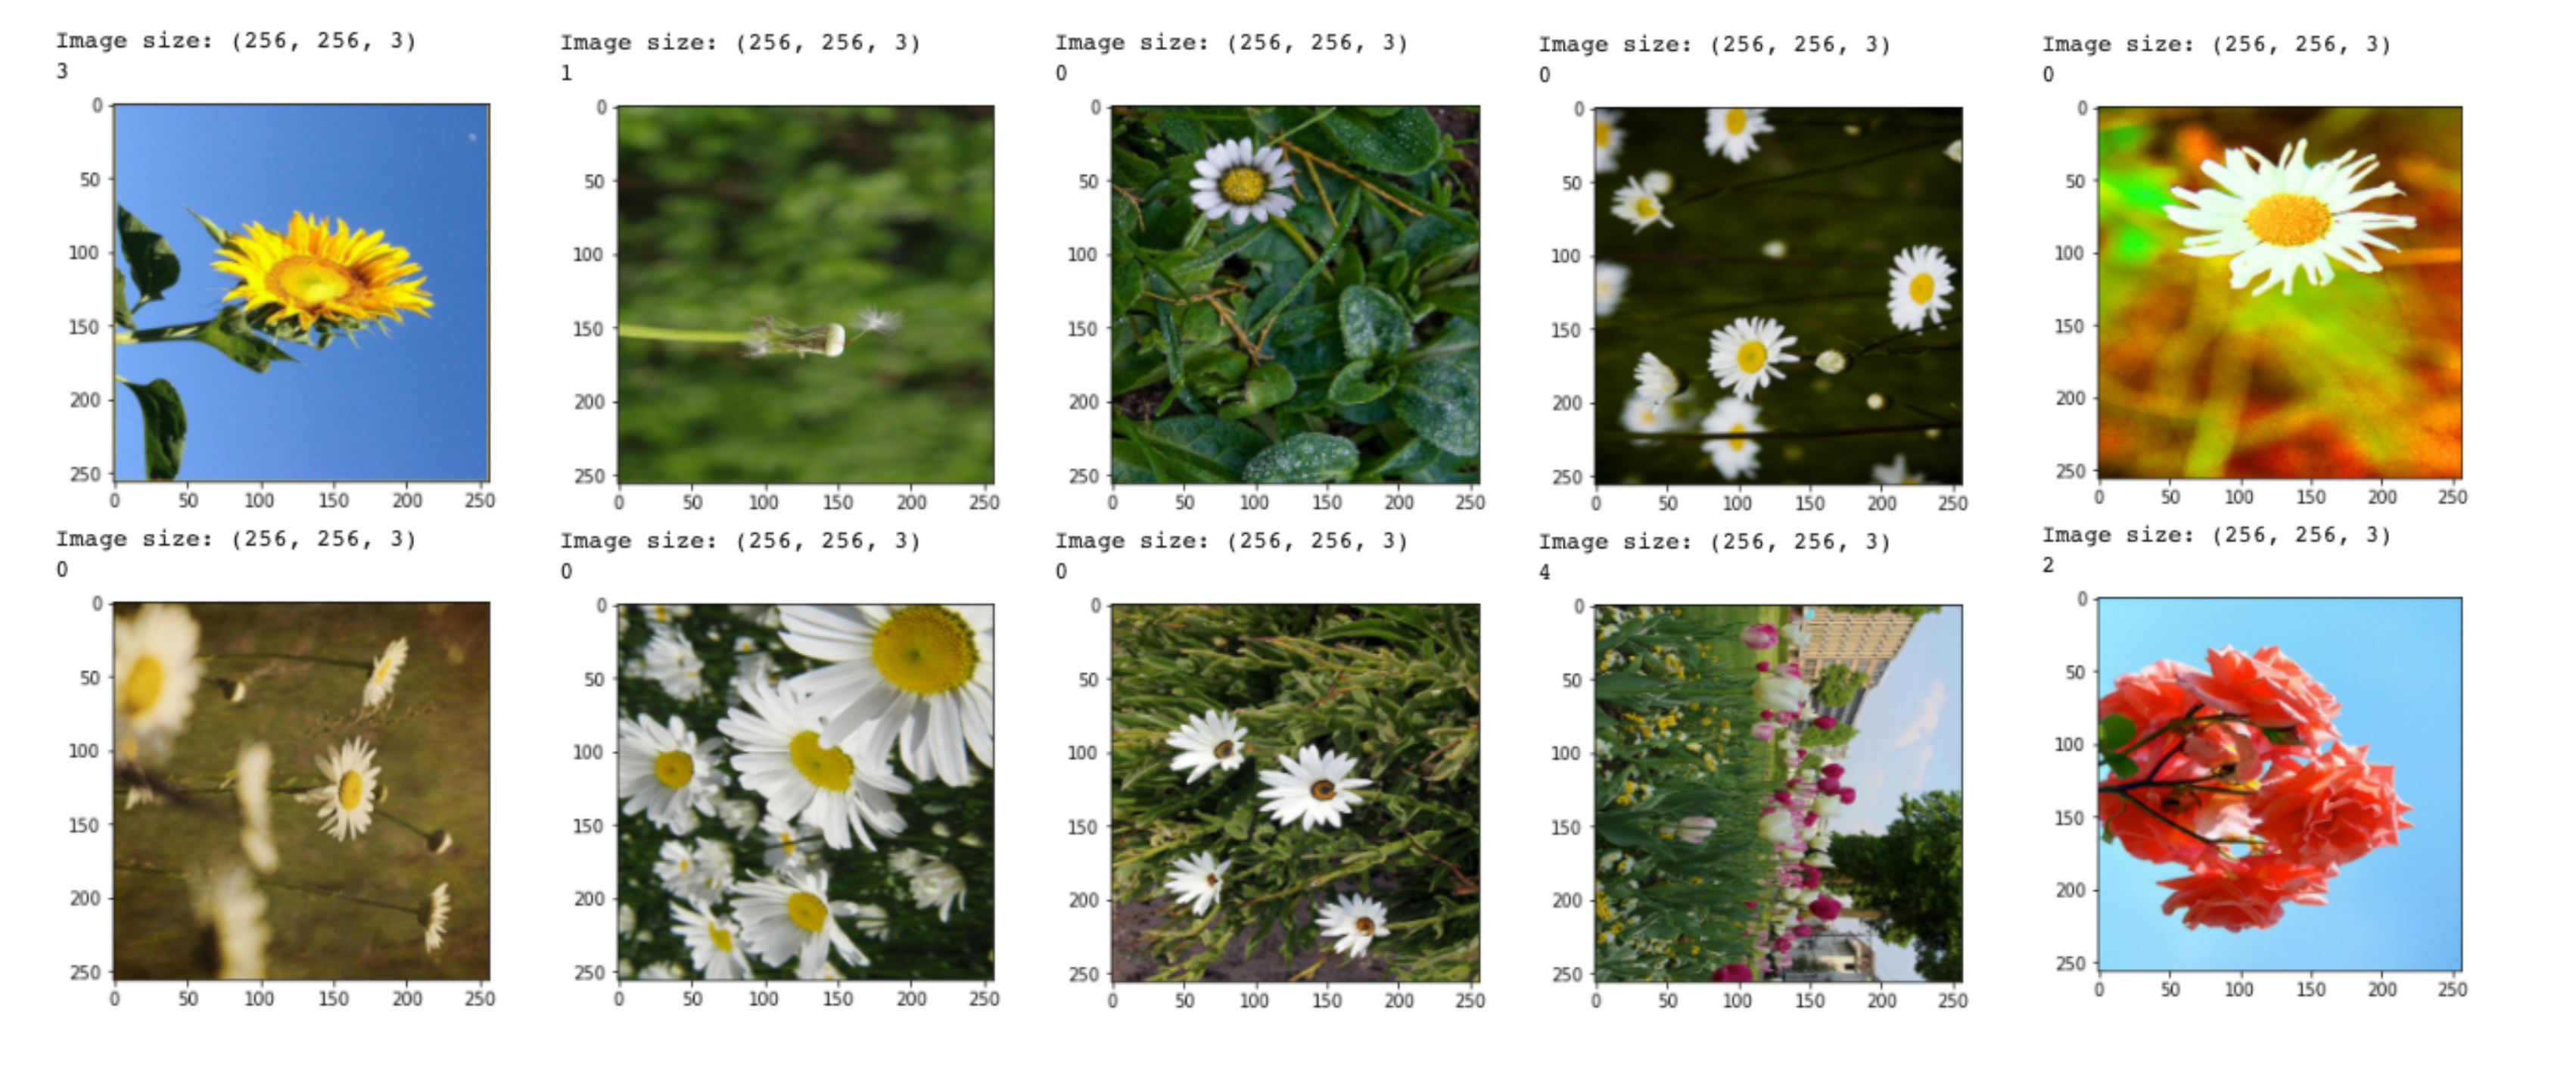
The data augmentation worked fine!
- Hub:
We do the exact same augmentation but this time we are using Hub to create the TF dataset. We re-use the Hub dataset ds_flowers_hub_resized constructed previously. We create the augmented TF dataset ds_flowers_hub_data_aug by replacing the previous function to_model_fit that was used in the mapping by the function normalize_and_augment that augments and normalizes our dataset:
def normalize_and_augment(item):
    x = item['images']/255 # normalize
    x = tf.image.random_flip_left_right(x)
    x = tf.image.random_flip_up_down(x)
    x = tf.image.rot90(x)
    y = item['labels']
    return (x, y)

ds_flowers_hub_tf = ds_flowers_hub_resized.tensorflow()

# We shuffle, cachhe, batched, augment and prefetch
ds_flowers_hub_data_aug = (ds_flowers_hub_tf
                  .shuffle(len(ds_flowers_tf_data), seed=shuffle_common_seed)
                  .cache()
                  .batch(batch_size)
                  .map(normalize_and_augment, num_parallel_calls=tf.data.AUTOTUNE)
                  .prefetch(tf.data.AUTOTUNE)
)
We check the images in the first batch:
We see that we have the same images in the first batch as in ds_directory_tf_data_data_aug (because we see the same shuffle_common_seed), however the random data augmentation are different: the images are rotated and flipped in other directions in ds_flowers_hub_data_aug than in ds_directory_tf_data_data_aug because we used random data augmentations.
4) Segmentation Dataset: Image + Mask
All of the previous examples used image classification datasets. But a lot of Computer Vision projects focus on segmentation tasks and not classification. If you are just starting out and do not know what is image segmentation - segmentation is a pixel-wize classification method.
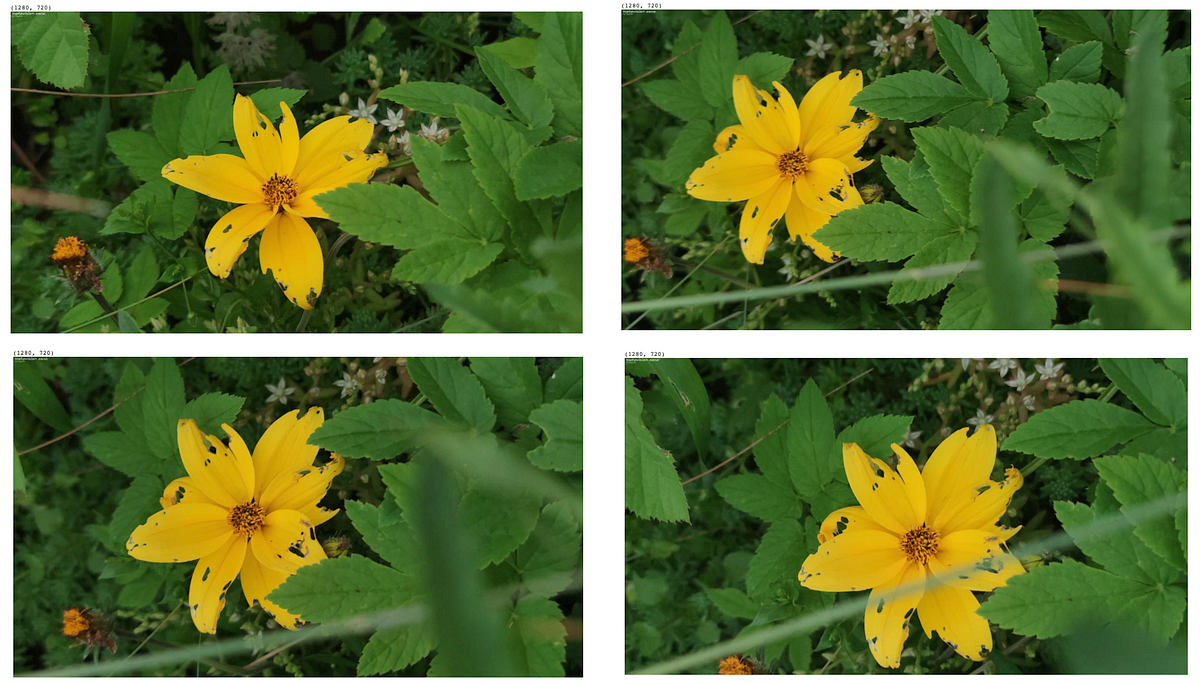
For this example, we will use the Kaggle dataset: Accurate damaged flower shapes/segmentation:
!export KAGGLE_USERNAME="xxxxx" && export KAGGLE_KEY="xxxxxx" && kaggle datasets download -d metavision/accurate-damaged-flower-shapessegmentation && unzip -n accurate-damaged-flower-shapessegmentation.zip
When looking in the dataset, we see that the images of the flowers are under the subfolder called “720p” and the corresponding masks are under the subfolder “mask”. We collect all the paths to the images in the list files_list_flowers_images and all the paths to the masks in the list files_list_flowers_masks. In total, we have 2544 pairs of image/mask.
As usual, we want to take a look at these images:
for i in range(4):
  img = Image.open(files_list_flowers_images[i])
  print(img.size)
  img.show()
for i in range(4):
  mask = Image.open(files_list_flowers_masks[i]).convert('L')
  print(mask.size)
  mask.show()
  print(np.unique(mask))
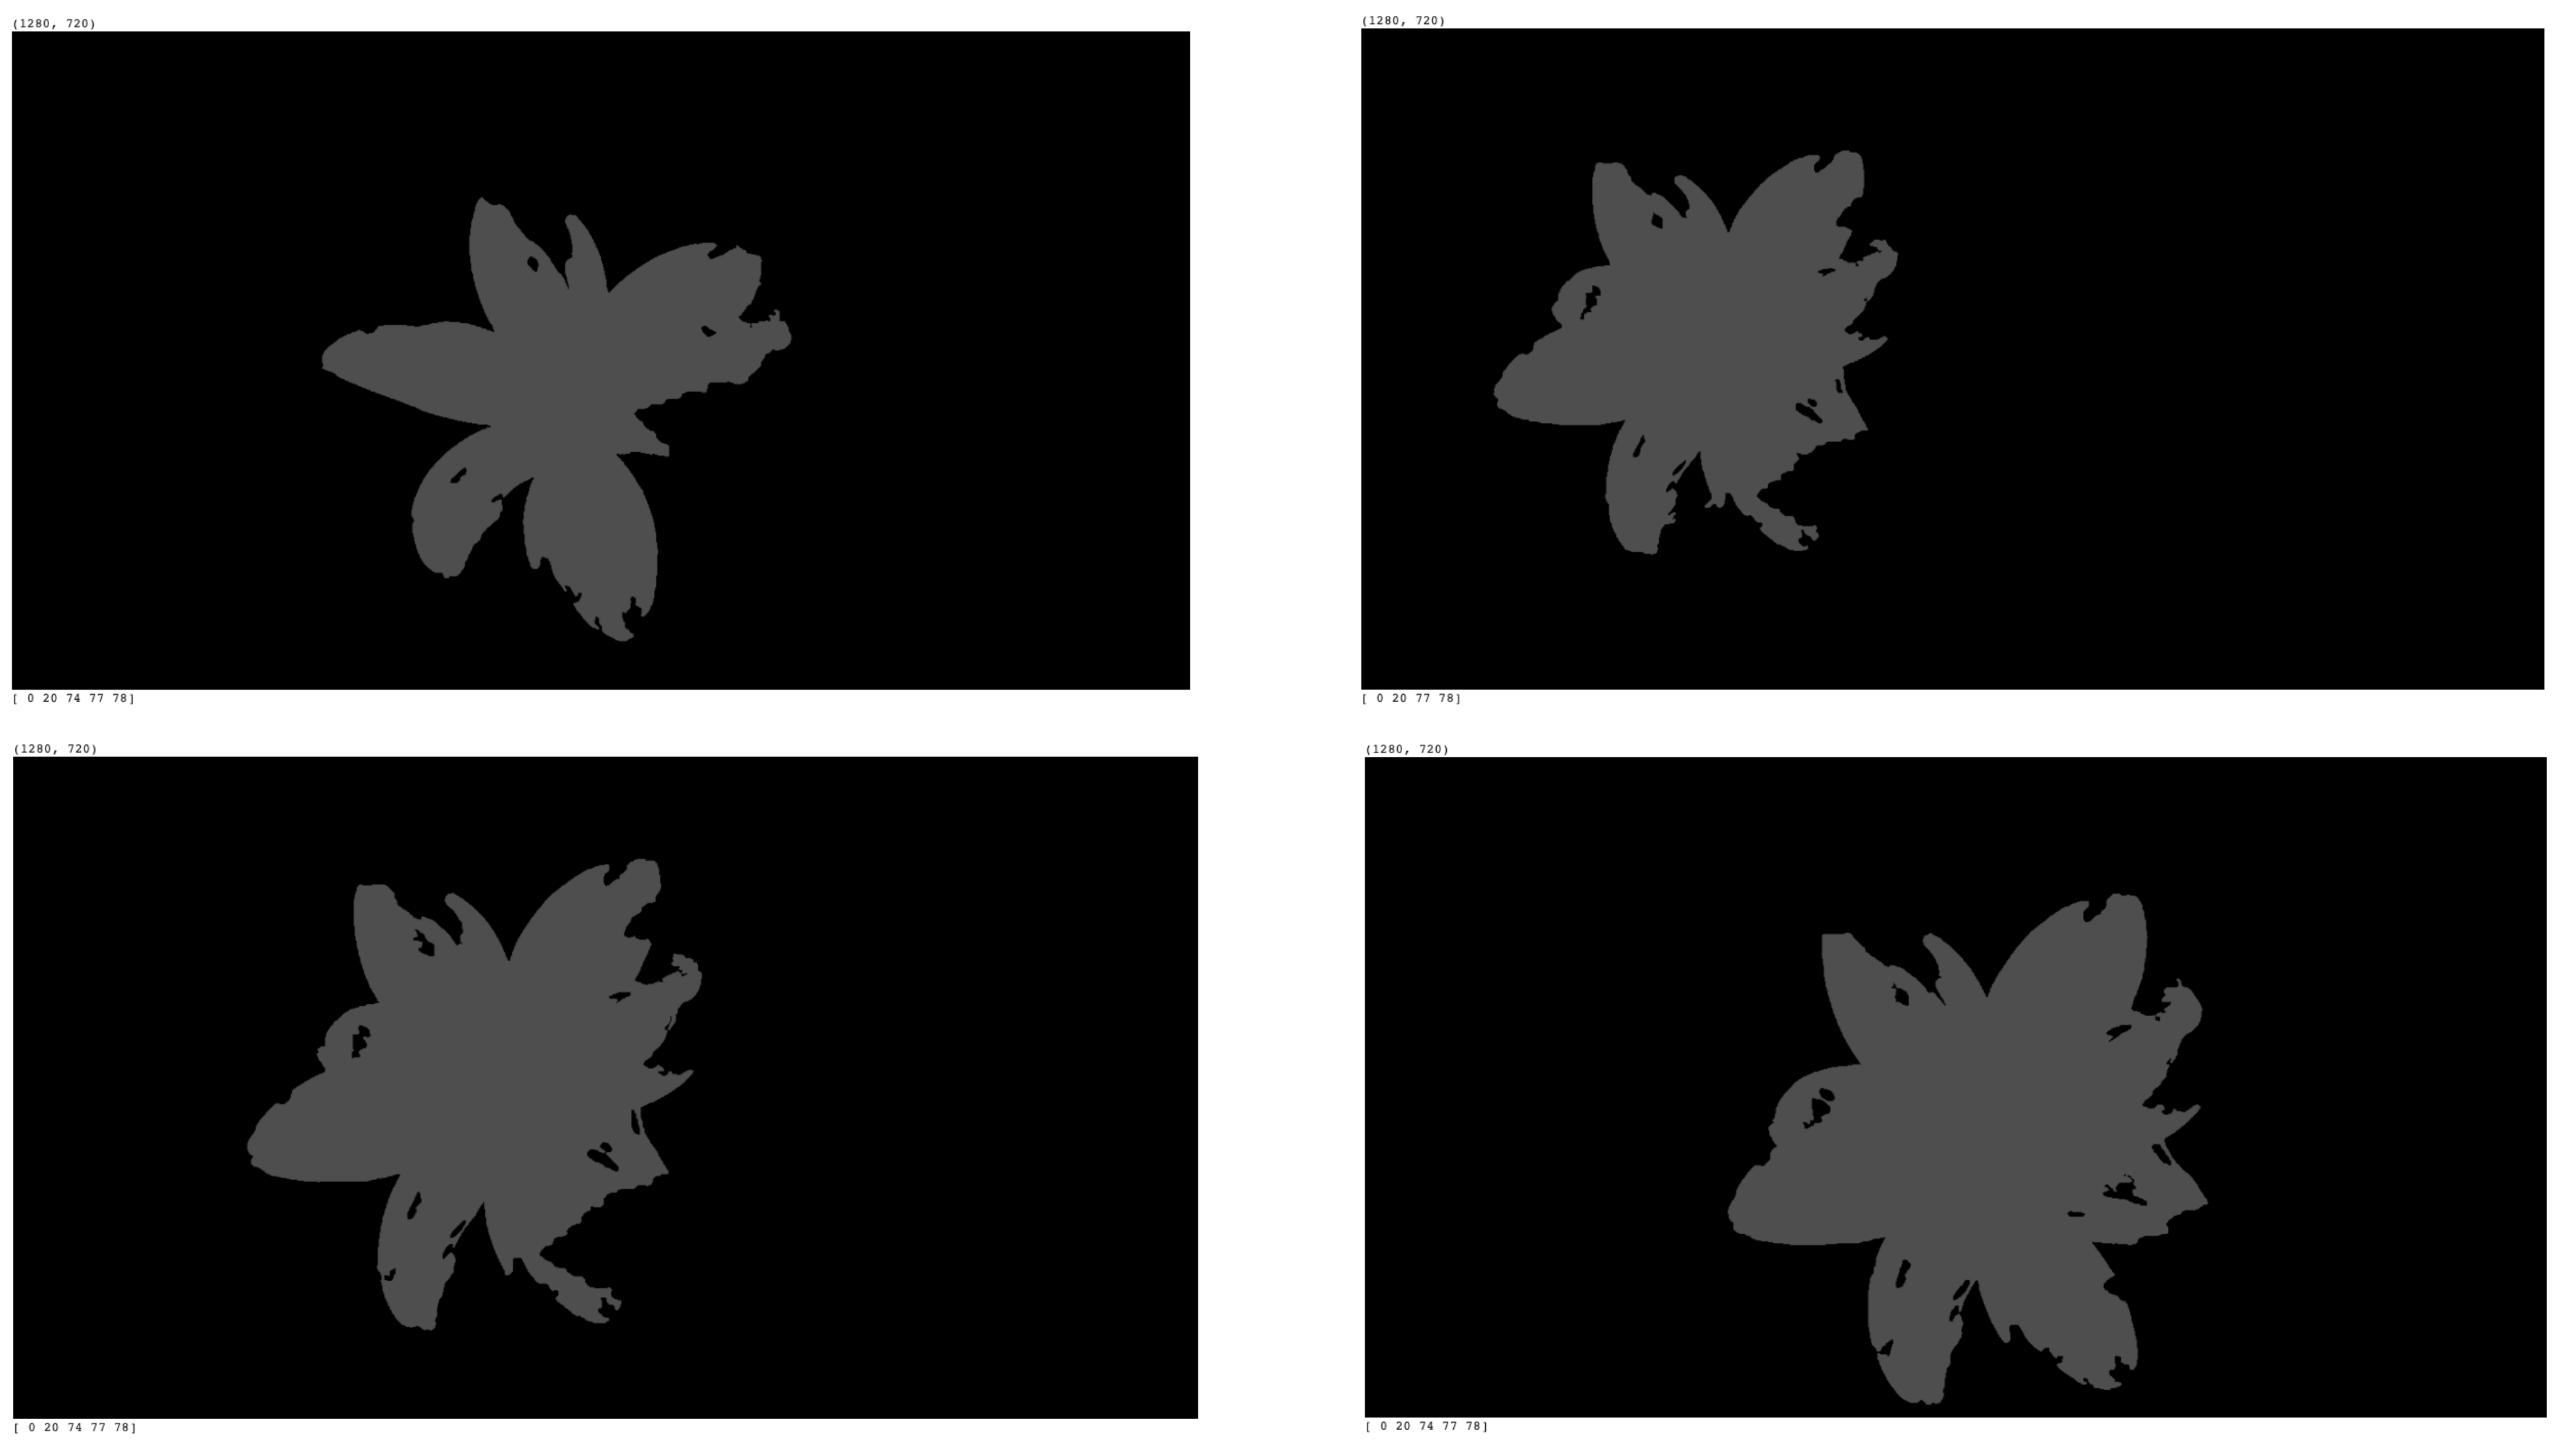
For the masks, we also display the np.unique(mask) because we want to know if the values are binary or not. Ideally, they should be: for example 0 for background and 1 for flower since we are planning on doing binary segmentation. However, we see here, that we have np.unique(mask)=[ 0 20 74 77 78] for the first mask for example. So, we need to keep in mind that we will have to do something about this when creating the dataset.
This time we want to resize the images to 512x512 because the original are too big to be efficiently used in a model on Google Colab (we would need way more resources). So we re-define some of the common variables:
resize_size = (512, 512)
batch_size = 4
shuffle_common_seed = 21
Okay, let’s start!
- tf.data:
We are using the same tf.data.Dataset.from_tensor_slices architecture as before to create the TF dataset with tf.data. But this time, we are passing two file lists instead of one: files_list_flowers_images and files_list_flowers_masks:
ds_flowers_tf_data_seg = tf.data.Dataset.from_tensor_slices((files_list_flowers_images, files_list_flowers_masks))

ds_flowers_tf_data_seg = (ds_flowers_tf_data_seg
                        # Calling parse_image_mask
                        .map(parse_image_mask, num_parallel_calls=tf.data.AUTOTUNE)
                        .batch(batch_size)
                        .shuffle(len(ds_flowers_tf_data_seg), seed=shuffle_common_seed)
                        .prefetch(tf.data.AUTOTUNE))
ds_flowers_tf_data_seg
However, we need to modify the function used in the mapping to read both the image and the mask. For this, we implement this new mapping function parse_image_mask:
def parse_image_mask(image_name, mask_name):
  # read the image, decode it, resize it, and normalize it
  image = tf.io.read_file(image_name)
  image = tf.image.decode_jpeg(image, channels=3)
  image = tf.image.resize(image, resize_size) / 255.0

  # read the mask, decode it
  mask = tf.io.read_file(mask_name)
  mask = tf.image.decode_jpeg(mask, channels=1)

  # Need to have binary values: 0 or 1
  mask = tf.cast(mask > 0, tf.int32)

  # Resize
  mask = tf.image.resize(mask, resize_size, method=tf.image.ResizeMethod.NEAREST_NEIGHBOR)

  # return the image and its mask
  return (image, mask)
In this new mapping function, we read the image and resize and normalize it. Then we read the mask perform a thresholding so that we only have binary values (0 or 1) for training the model, and finally we resize it.
NB: we used the method: method=tf.image.ResizeMethod.NEAREST_NEIGHBOR when resizing the images so that it does not add new values that are not initially in the images (for example a value different from 0 or 1 for the mask)
We implement a function show_img_mask_in_first_batch to visualize the images and masks in the first batch of a dataset ds:
def show_img_mask_in_first_batch(ds, batch_size):
  for image, mask in ds:
    # first batch
    for b in range(batch_size):
      print(image.numpy()[b].shape)
      plt.imshow(image.numpy()[b])
      plt.show()
      print(mask.numpy()[b].shape)
      plt.imshow(mask.numpy()[b][:,:,0])
      plt.show()
      print(np.unique(mask.numpy()[b][:,:,0])) # we want [0. 1.]
    break
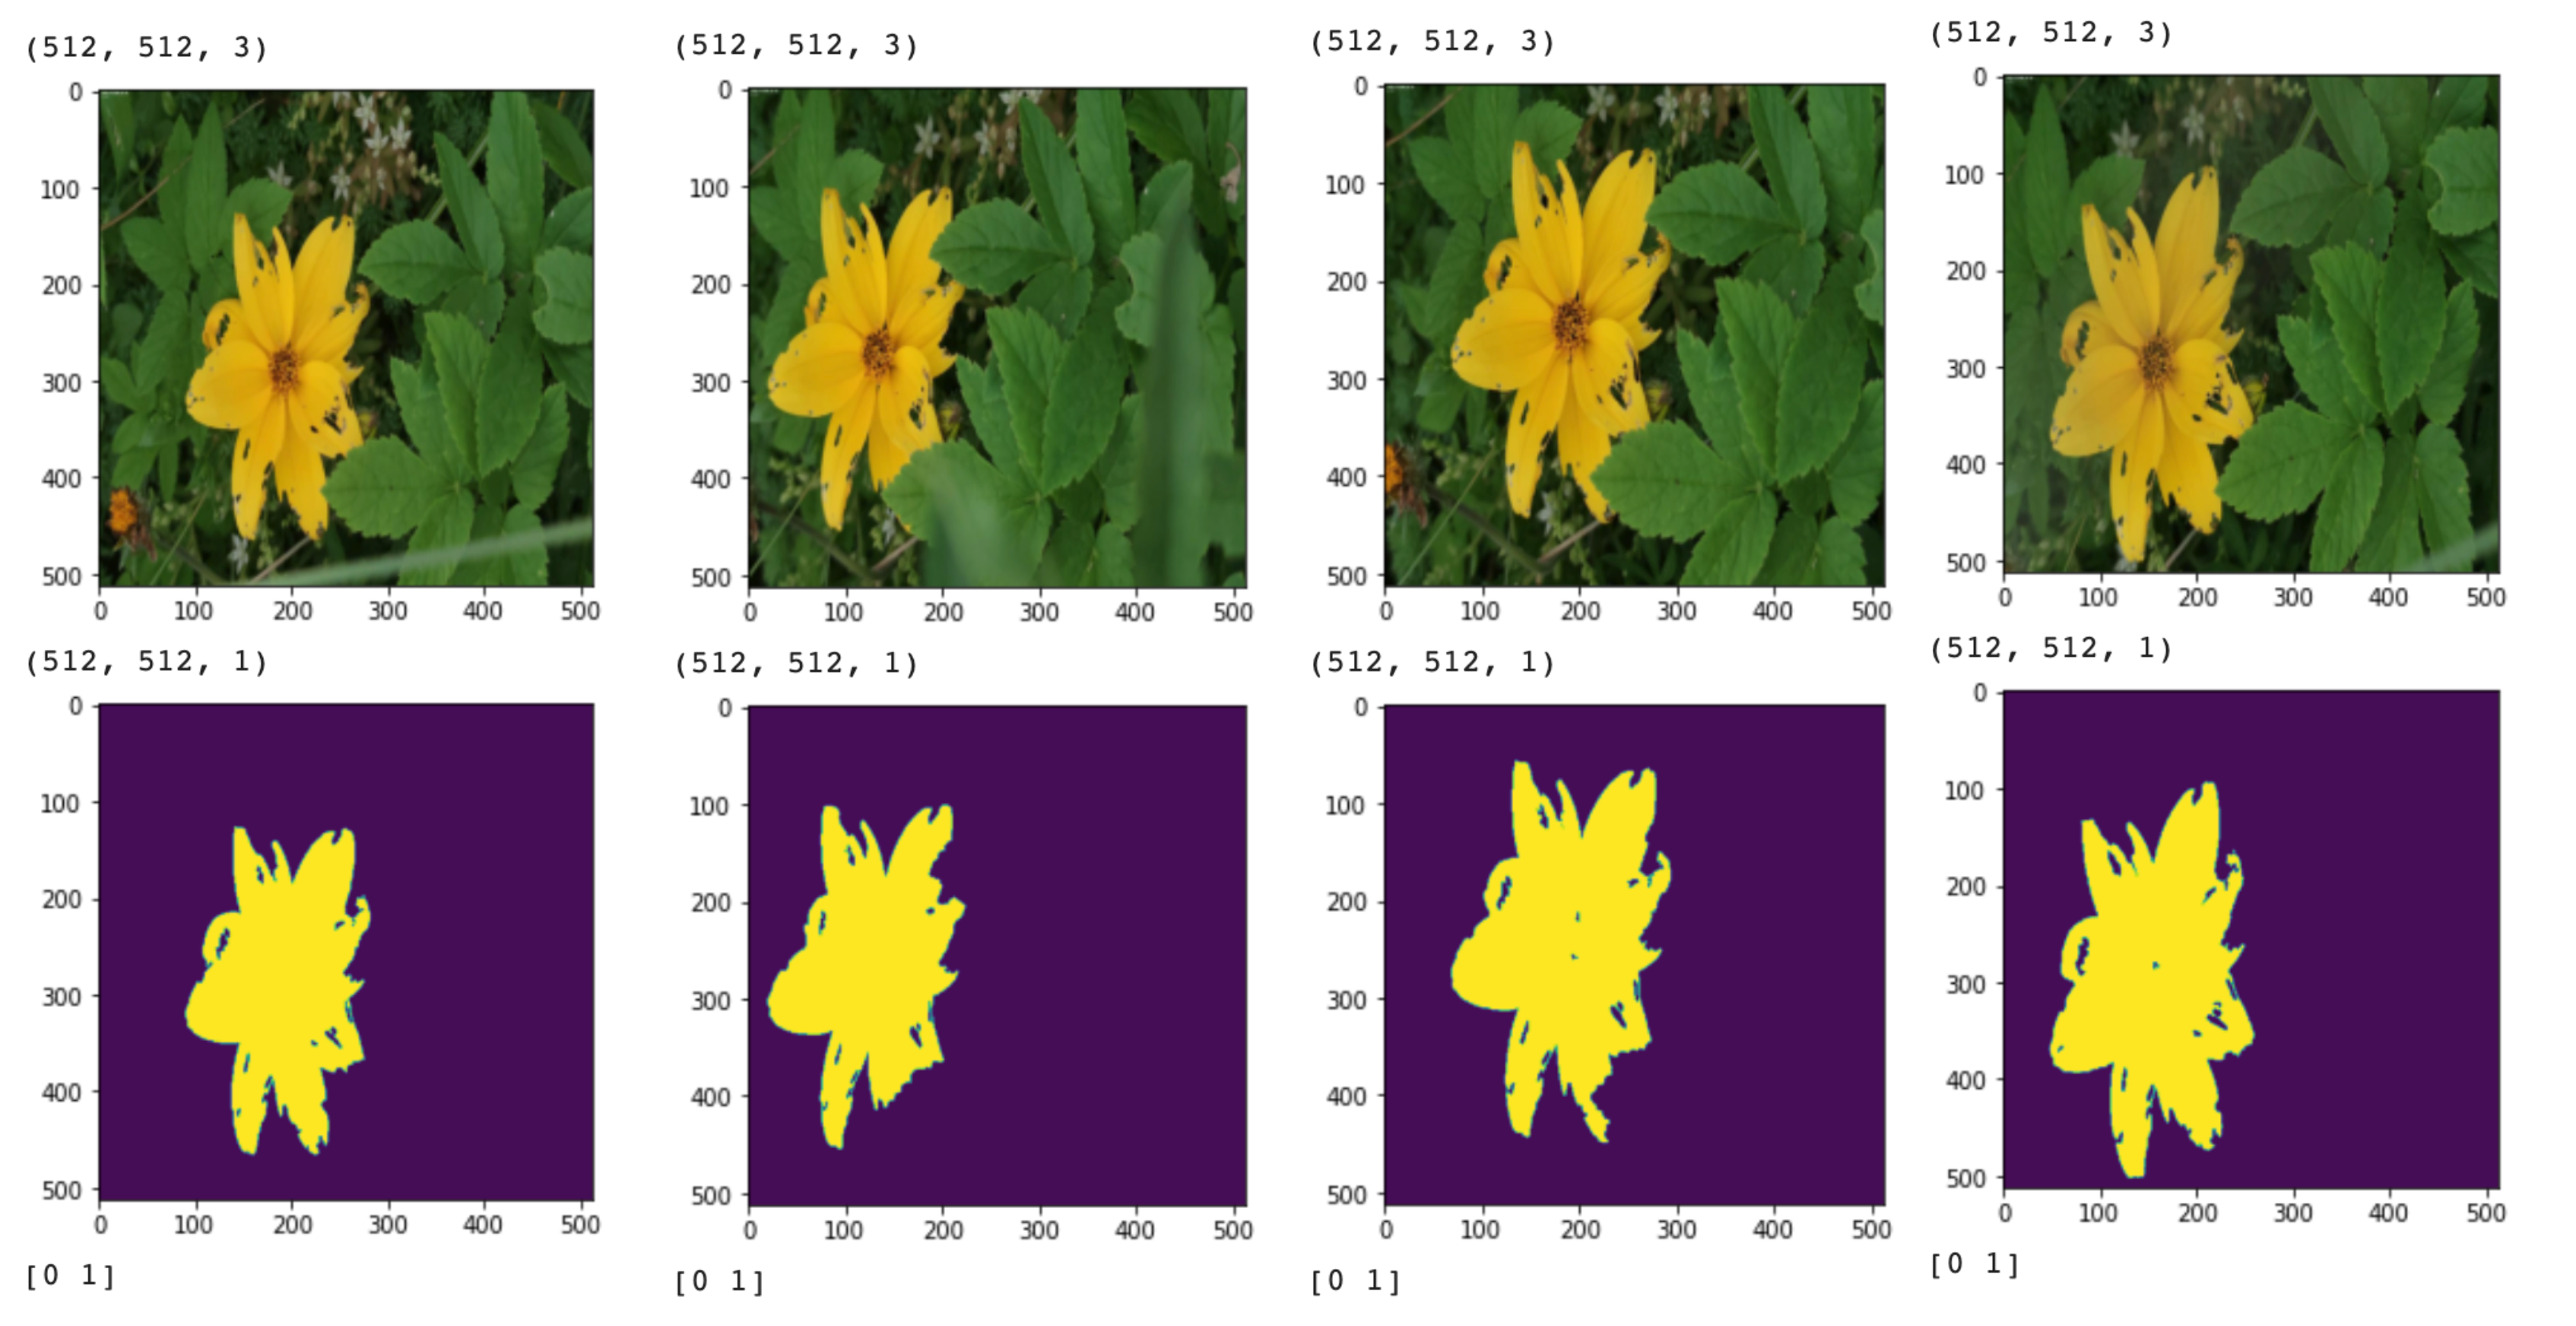
And use it with our new segmentation dataset ds_flowers_tf_data_seg:
show_img_mask_in_first_batch(ds_flowers_tf_data_seg, batch_size)
Here we see that we do have only 0 and 1 as values in the mask image. Both the images and masks are correctly resized.
- Hub:
First, we create the dataset ds_flowers_hub_seg locally at the path ./flowers_seg_hub, we populate it using the list files_list_flowers_images:
with hub.empty('./flowers_seg_hub') as ds_flowers_hub_seg:
    # Create the tensors with names of your choice.
    ds_flowers_hub_seg.create_tensor('images', htype = 'image', sample_compression = 'jpg')
    ds_flowers_hub_seg.create_tensor('masks', htype = 'image', sample_compression = 'png')

    # Iterate through the files and append to hub dataset
    for file in tqdm(files_list_flowers_images):
        # Append to images tensor using hub.read
        ds_flowers_hub_seg.images.append(hub.read(file))

        path_to_mask = file.replace('image', 'mask').replace('720p','mask').replace('jpg','png')
        # Append to masks tensor using Pillow Image
        ds_flowers_hub_seg.masks.append(np.array(Image.open(path_to_mask)))
NB: the paths to the masks are the same as the ones to the images if we replace the strings “image” by “mask”, “720p” by “masks” and “jpg” by “png”. This is what we are doing when defining the variable path_to_mask.
Now that we have our datatse ds_flowers_hub_seg, we can create the TF dataset:
ds_flowers_hub_seg_tf = ds_flowers_hub_seg.tensorflow()

ds_flowers_hub_seg_tf =  (ds_flowers_hub_seg_tf
                        # calling to_model_fit
                        .map(lambda x: to_model_fit(x))
                        .batch(batch_size)
                        .shuffle(len(ds_flowers_hub_seg), seed=shuffle_common_seed)
                        .prefetch(tf.data.AUTOTUNE))
And this time, this is the mapping function to_model_fit that we use:
def to_model_fit(item):
    x = tf.image.resize(item['images'], resize_size)/255
    y = item['masks']

    # 3 channels to 1 channel
    y = tf.image.rgb_to_grayscale(y)

    # Need to have binary values: 0 or 1
    y = tf.cast(y > 0, tf.int32)

    # Resize
    y = tf.image.resize(y, resize_size, method=tf.image.ResizeMethod.NEAREST_NEIGHBOR)

    return (x, y)
This function resize and normalize the images, convert the RGB masks to grayscale (3 channels to 1 channel) and perform the same thresholding as we did for ds_flowers_tf_data_seg, and finally resize the mask.
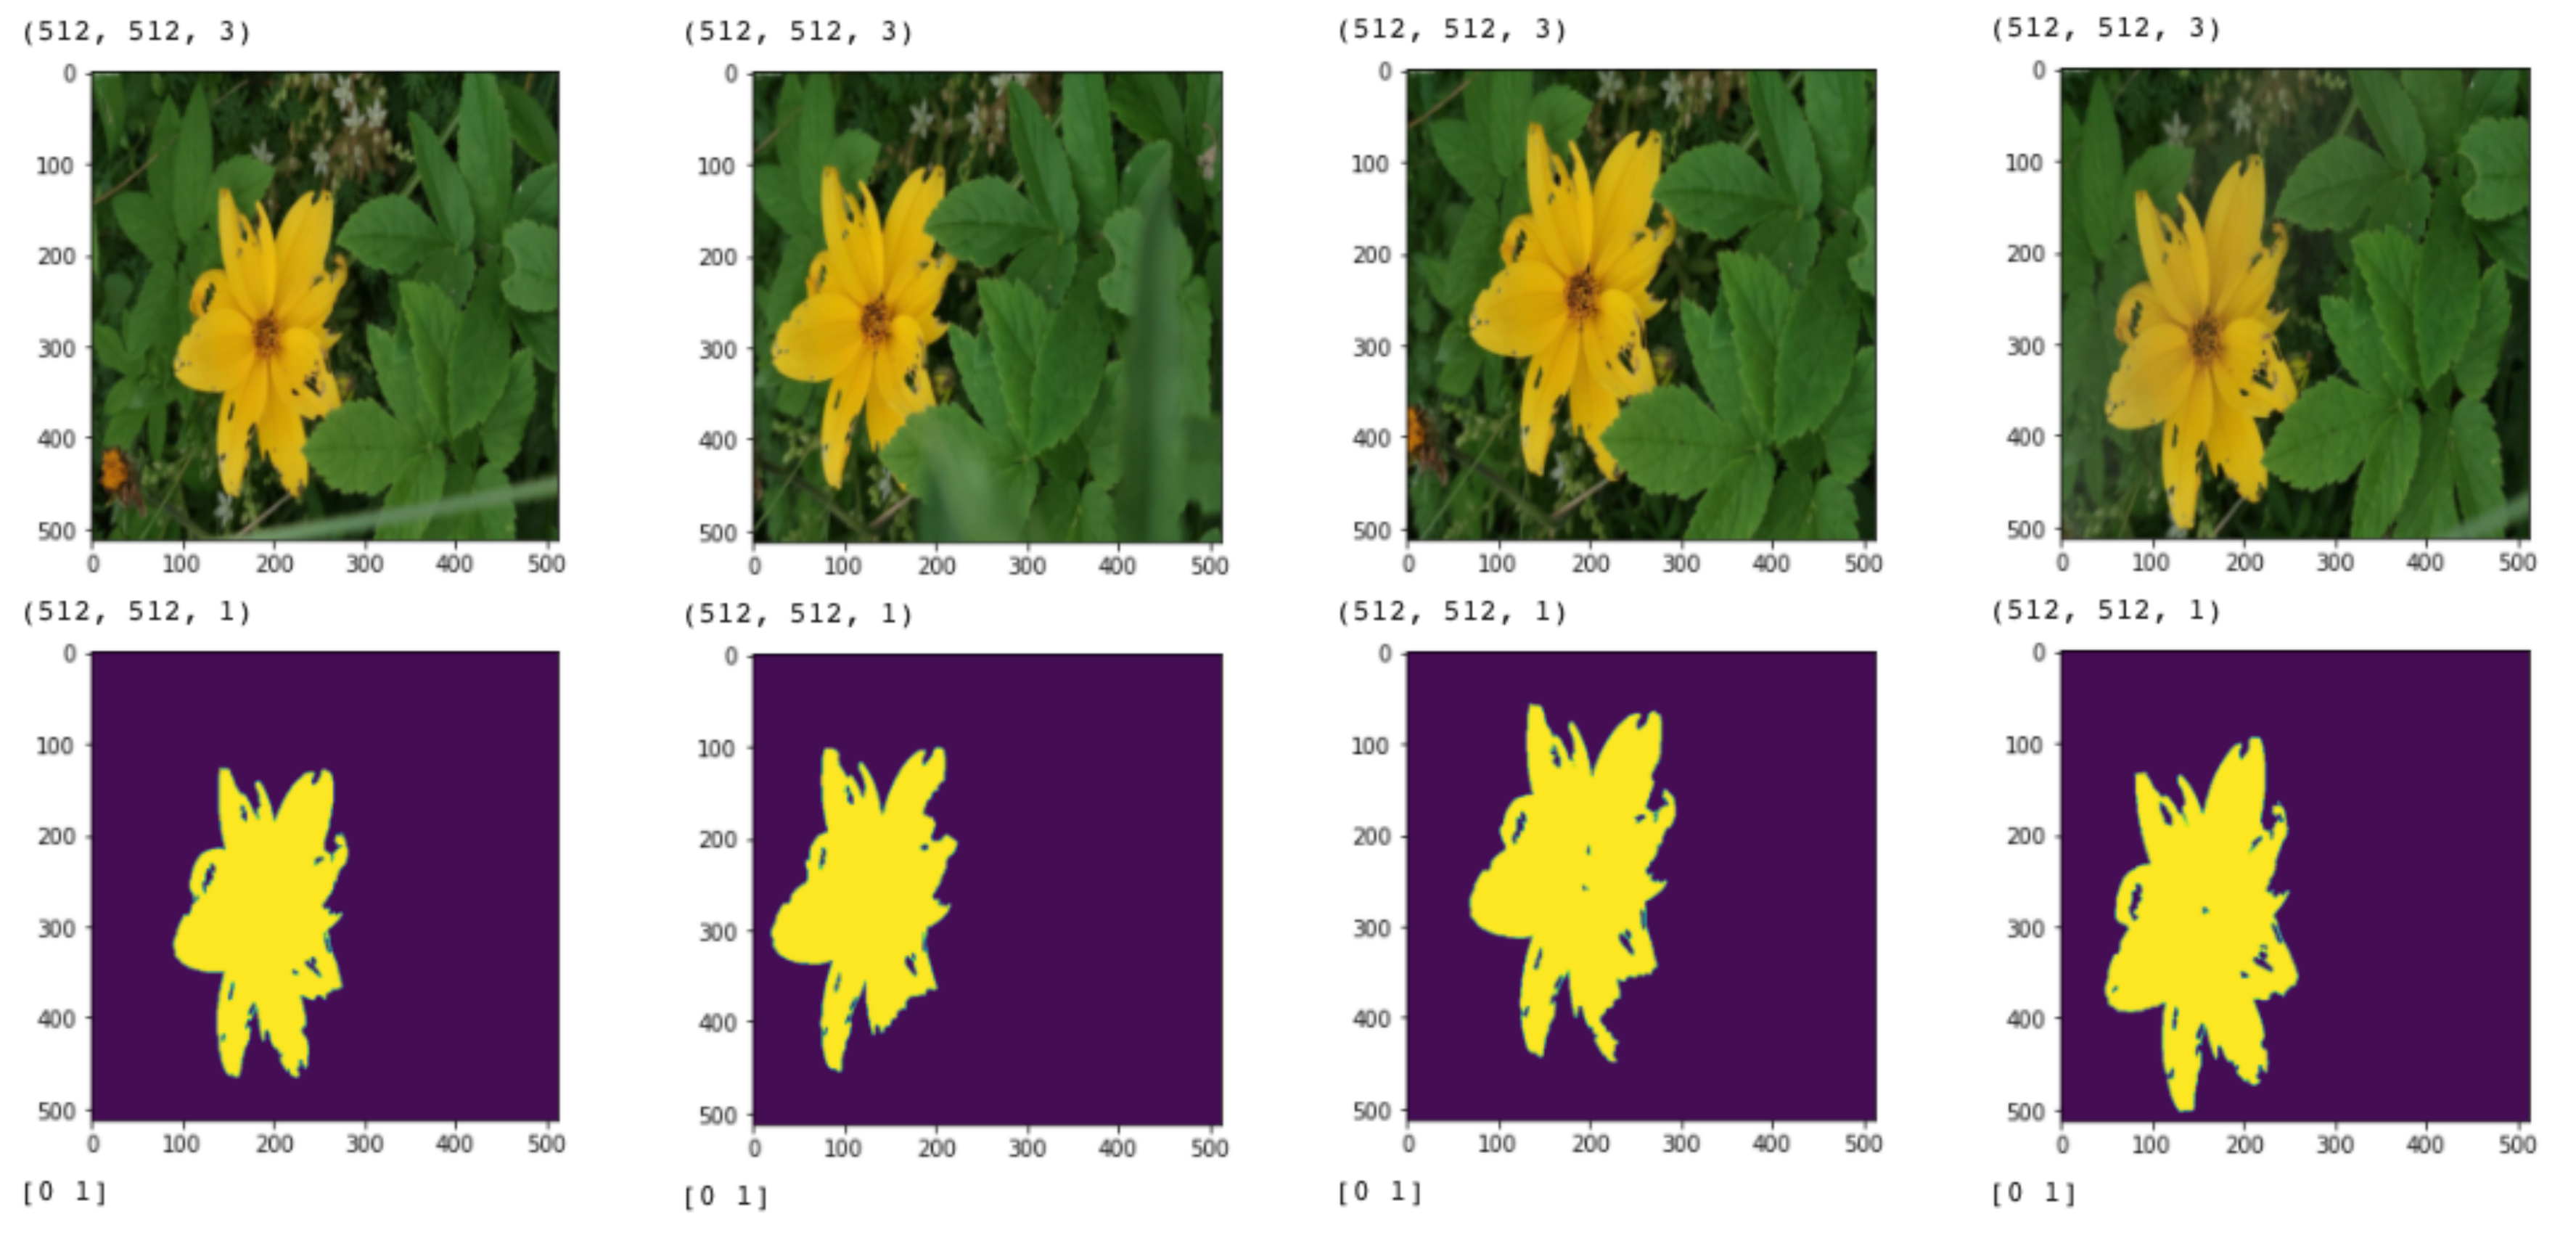
Let’s take a look at the first batch:
show_img_mask_in_first_batch(ds_flowers_hub_seg_tf, batch_size)
This looks good! Now, we want to check that these datasets are both usable to train a segmentation model.
We use the Unet model architecture from the article Binary Semantic Segmentation: Cloud detection with U-net and Activeloop Hub:
model = unet(input_shape = (512,512,3))
model.compile(optimizer=tf.keras.optimizers.Adam(1e-4),
              loss='binary_crossentropy',
              metrics=['accuracy', tf.keras.metrics.Recall(name="recall"),
                       tf.keras.metrics.Precision(name="precision"),
                       tf.keras.metrics.MeanIoU(num_classes=2, name='iou')])
and then train with the two datasets we just created:

Both datasets were usable to train Unet for 1 epoch 🌼
The Notebook for this tutorial is available here.