How to efficiently create Computer Vision dataset for deep learning tasks?
Data is the key component of any Deep Learning project. Getting it right at the beginning by using the correct tools is of paramount importance. However, Computer Vision datasets are hard to manage and often require hardware with a lot of memory.
This article aims to be a simple tutorial on how to create a computer vision dataset for training a Computer Vision (CV) model. Computer vision datasets can get really heavy really fast, and dealing with such data is often complicated and limited because of memory capacities, as previously mentioned. Therefore, in this article, we will study how to create a dataset with the famous open-source Hierarchical Data Format version 5 (HDF5) file format, and then compare this to the creation of the same dataset using Hub.
What is HDF5?
The Hierarchical Data Format version 5 (HDF5) is an open-source file format that enables working with large, complex and heterogeneous data. So what is HDF5? HDF5, one of the most popular dataset formats, uses a structure similar to a file directory, where one can organize data within the file in various structured ways (just as with files stored on your computer). In short, an HDF5 file can be described as the definition of a file system (folders, subfolders, and files stored in the computer) in a single file.
🦒 🐕 🐈 Setting up the Animals-10 Kaggle dataset 🦒 🐕 🐈
For this tutorial, we will use the Animals-10 Kaggle dataset that contains around 28K animal pictures of 10 different categories (dog, cat, horse, spider, butterfly, chicken, sheep, cow, squirrel, elephant) taken from Google Images.
To download and unzip this dataset, we use this command:
!export KAGGLE_USERNAME="xxxxxxx" && export KAGGLE_KEY="xxxxxx" && kaggle datasets download -d alessiocorrado99/animals10 && unzip -n animals10.zip && rm -r animals10.zip
Let’s explore this dataset a bit…
import glob
import os

dataset_animals = './raw-img'
file_names = glob.glob(dataset_animals + '/**/*.jpeg')

print(f'There are {len(file_names)} images in the dataset')

class_names = os.listdir(dataset_animals)
print(f'This dataset has {len(class_names)} classes: {class_names}')
➡️ There are 24209 images in the dataset
This dataset has 10 classes: [‘mucca’, ‘ragno’, ‘cane’, ‘pecora’, ‘gallina’, ‘scoiattolo’, ‘farfalla’, ‘gatto’, ‘cavallo’, ‘elefante’]
import random
import matplotlib.pyplot as plt
import cv2
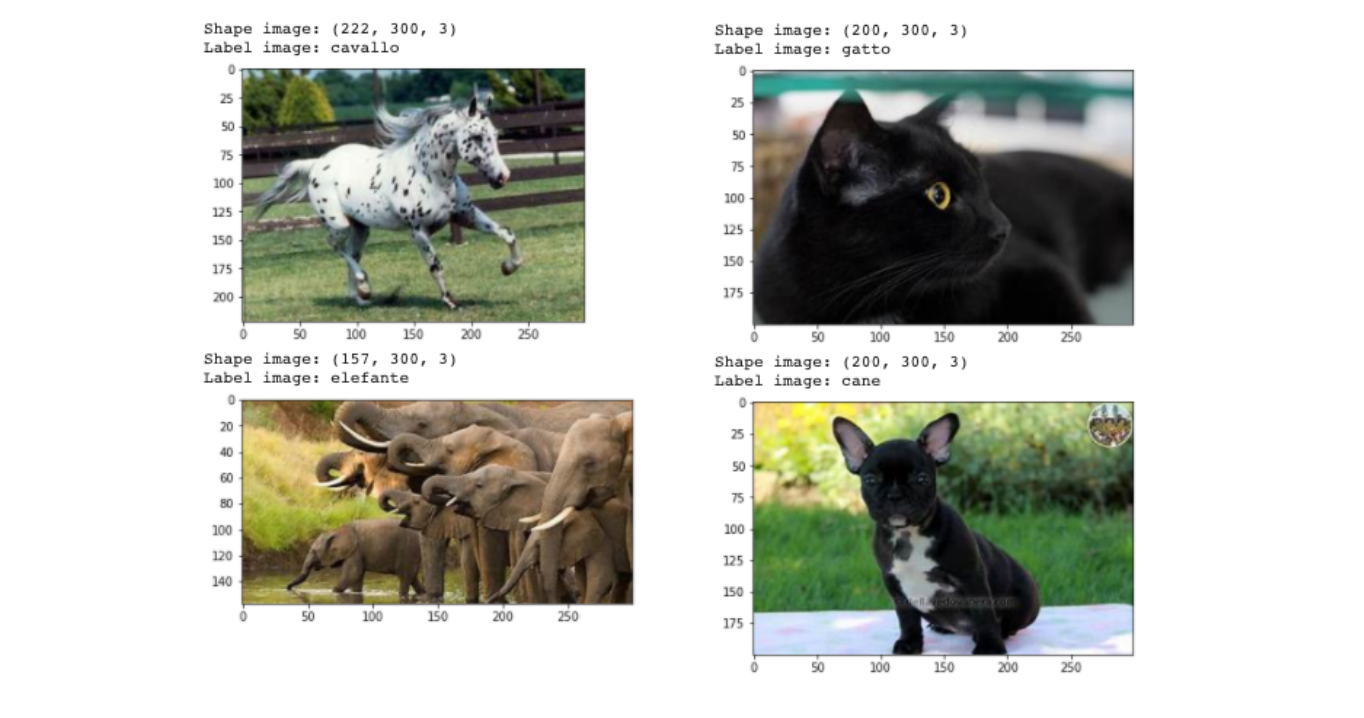
# List of 4 random images indexes to visualize in the dataset
list_random_indexes = [random.randint(0,len(file_names)) for i in range(4)]
for i in list_random_indexes:
# cv2 reads the images in BRG so we use cvtColor to convert them to RGB
train_img = cv2.cvtColor(cv2.imread(file_names[i]), cv2.COLOR_BGR2RGB)
print(f'Shape image: {train_img.shape}')
label_text = os.path.basename(os.path.dirname(file_names[i]))
print(f'Label image: {label_text}')
plt.imshow(train_img)
plt.show()
which returns these images:
1) Creating a Computer Vision dataset with Hierarchical Data Format version 5 (HDF5)
In the previous section, we reviewed what HDF5 is. An additional piece of information you need to know about HDF5 is that it is organized in groups and datasets:
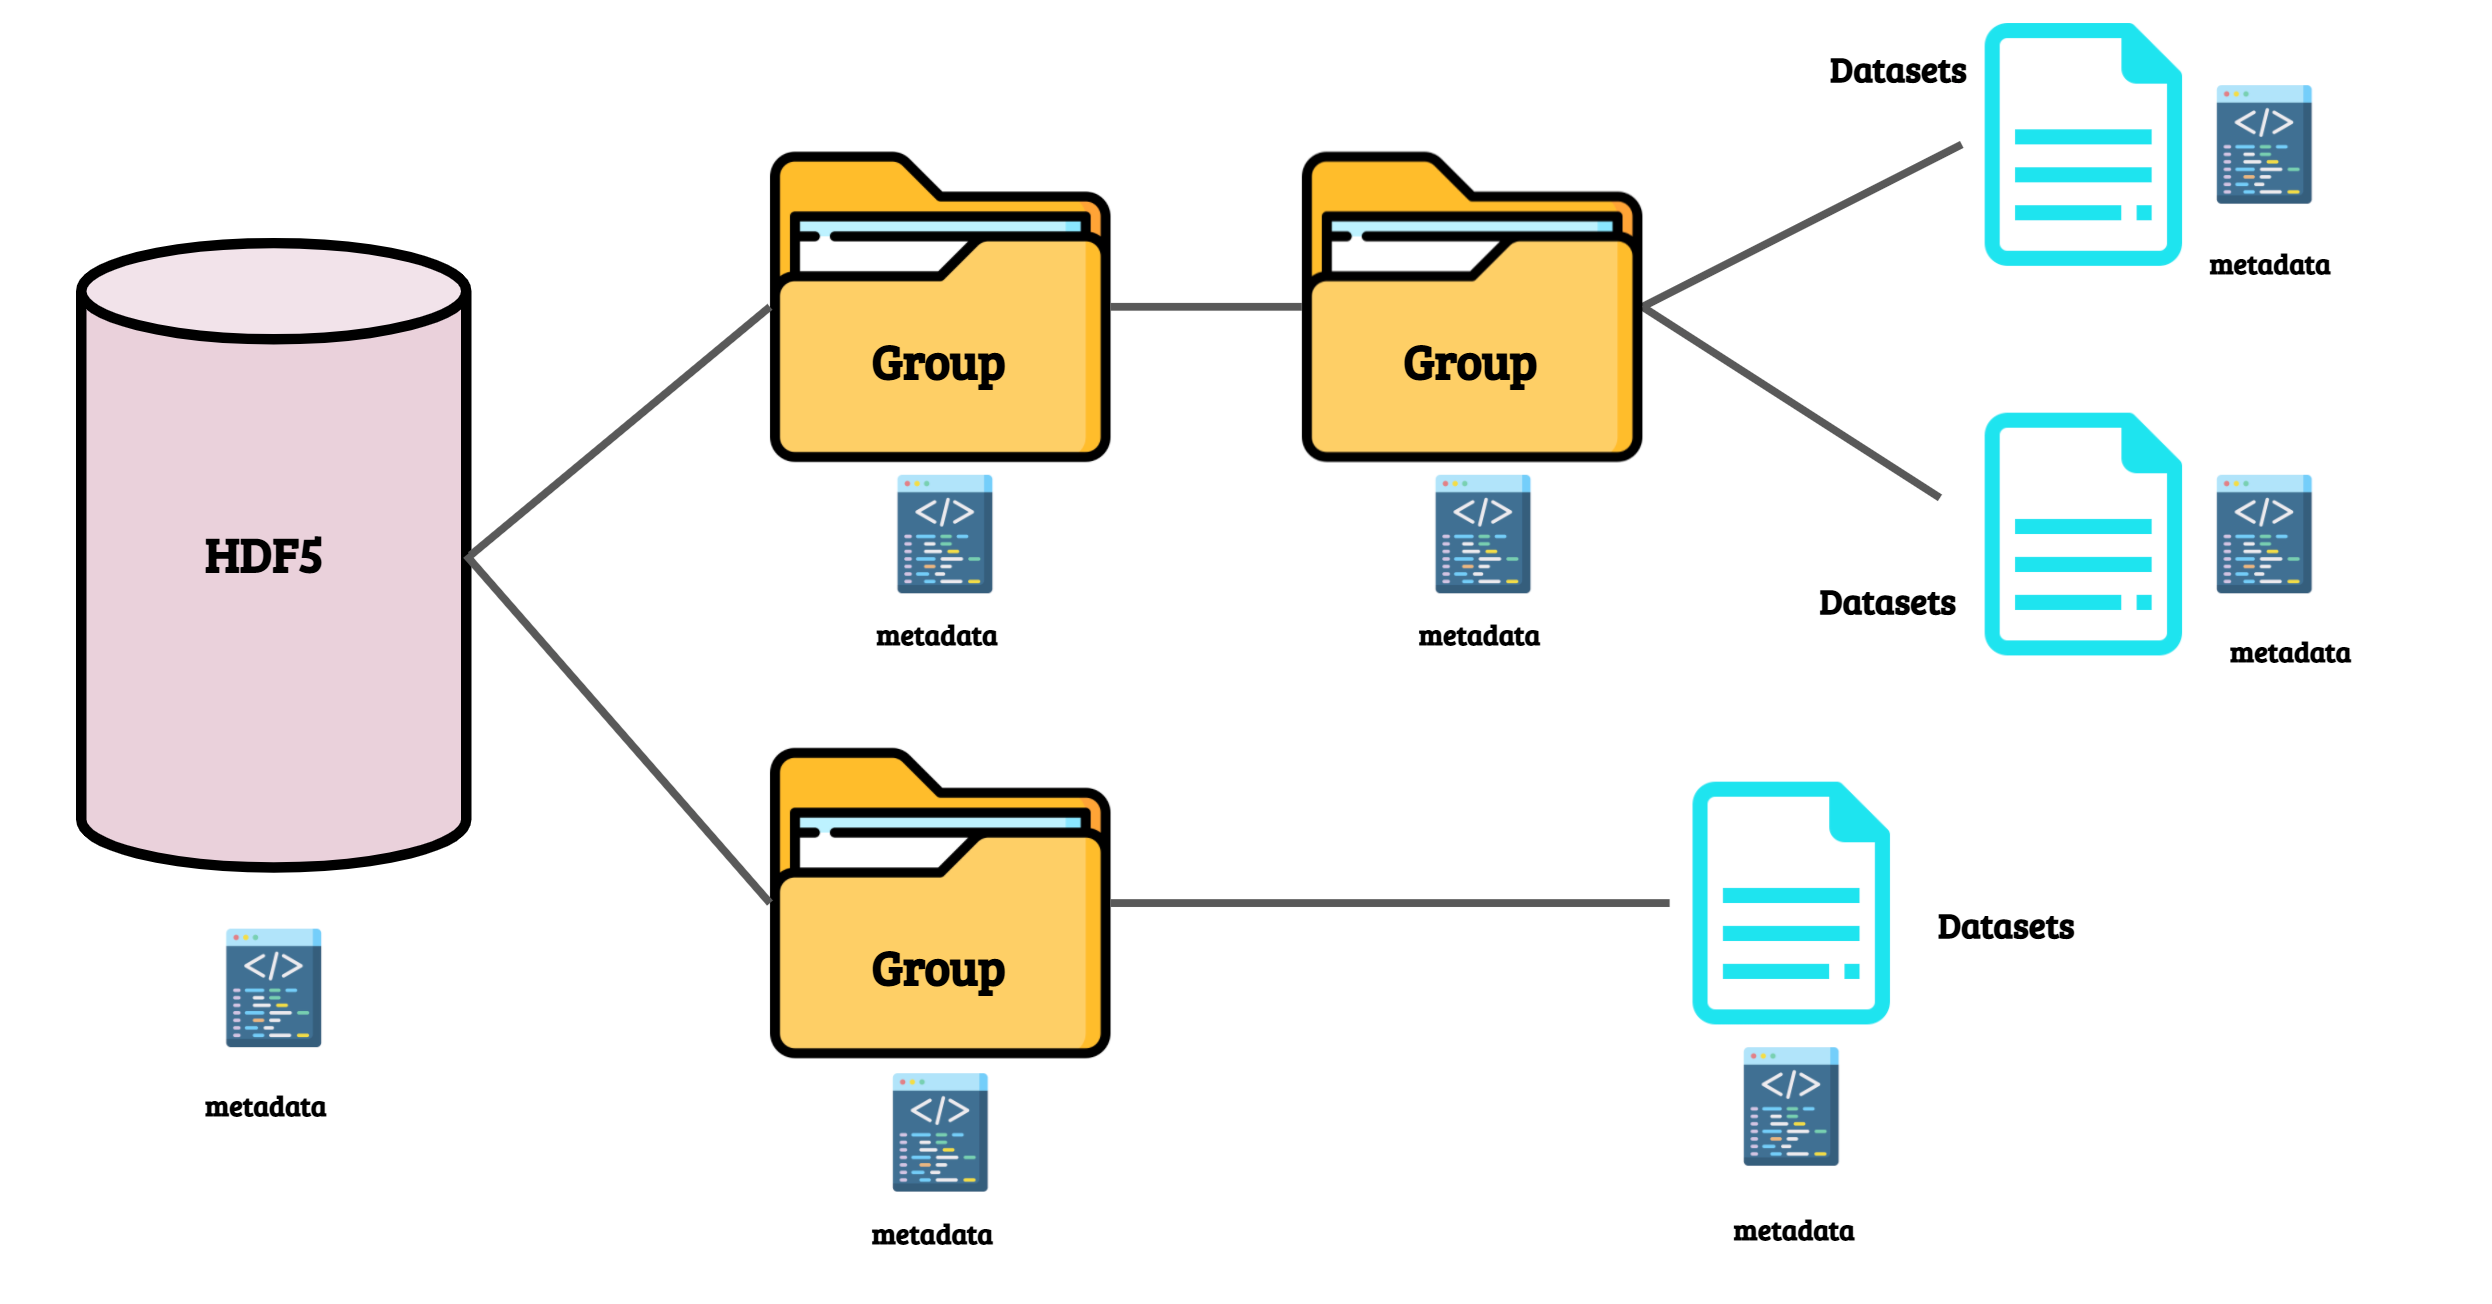
Let’s create Animals-10 dataset in the HDF5 format!
First, we need a function that will be used as a function’s timer so that we can compare the execution times for the datasets in Hub and HDF5 format:
from functools import wraps
from time import time

def timeit(func):
    @wraps
    def wrapper(*args, **kwargs):
        start = time()
        result = func(*args, **kwargs)
        end = time()
        print(f'{func.__name__} executed in {end - start:.4f} seconds')
        return result, end - start

return wrapper
Using the python package h5py, we create the HDF5 file ./datasets/animals-10-hdf5 by going through all images in the dataset, reading them, and adding each image to the HDF5 dataset as one dataset each time with, as name, the index of the image in the list file_names. We time the execution using the function timeit defined previously:
import h5py
from tqdm import tqdm

dataset_h5_path = "./datasets/animals-10-hdf5"

@timeit
def create_hdf5_dataset(file_names):
  with h5py.File(f'./{dataset_h5_path}.h5', 'w') as hf:
      for i in tqdm(range(len(file_names))):
          # cv2 reads the images in BGR so we convert them to RGB
          image = cv2.cvtColor(cv2.imread(file_names[i]), cv2.COLOR_BGR2RGB)
          hf.create_dataset(str(i), data=image)
  return hf

hf = create_hdf5_dataset(file_names)

This process took 47.1463 seconds.
As specified previously, this HDF5 dataset is organized in datasets for each image and the name of the datasets are the indexes of the images in the list. So, we did not save the labels corresponding to these images.
Another way to do this in order to keep the information about the labeling, is to create two datasets: one called images and one called labels. We then populate these datasets using the NumPy array gathering all the images’ arrays and another Numpy array gathering all the labels’ arrays. In order to be able to do this, we need all the images to be the same size so we also use the cv2 function resize and resize the images to a random size we chose: (256,256).
So first, we create the lists of all the images and labels, and then, we create the computer vision dataset called ./datasets/animals-10-img-labels-hdf5 with these two lists as datasets:
dataset_h5_images_labels_path = "./datasets/animals-10-img-labels-hdf5"

@timeit
def hdf5_dataset():
  # Gathering all images and labels in lists to be stored in the hf dataset in separate datasets
  images = []
  labels = []

for i in tqdm(range(len(file_names))):
    image = cv2.cvtColor(cv2.imread(file_names[i]), cv2.COLOR_BGR2RGB)
    # images need to be resize for the creation of the hdf5 dataset "images"
    image = cv2.resize(image, (256,256))
    images.append(image)
    label_text = os.path.basename(os.path.dirname(file_names[i]))
    label_num = class_names.index(label_text)
    labels.append(label_num)

# Create the hdf5 dataset
  with h5py.File(f'./{dataset_h5_images_labels_path}.h5', 'w') as hf:
    images_h5_dataset = hf.create_dataset("images", np.shape(images), data=images)
    labels_h5_dataset = hf.create_dataset("labels", np.shape(labels), data=labels)

hdf5_dataset()

➡️ This execution time is a bit higher than before but now we have the images and labels organized in two datasets.
2) An HDF5 alternative: Creating a Computer Vision dataset with Hub
Hub format is an HDF5 alternative that enables deep learning applications. Now, we will create a Hub dataset using the same Animals-10 Kaggle dataset.
In order to import hub, we use this command line (and restart the runtime afterward):
!pip install hub==2.0.9
Then, we can create our local Hub Animals-10 dataset called ./datasets/animals-10-hub and again, we time the execution:
import hub

dataset_hub_path = "./datasets/animals-10-hub"

@timeit
def create_hub_dataset(dataset_path, file_names):
  with hub.empty(dataset_path, overwrite=True) as ds:
      # Create the tensors with names of your choice.
      ds.create_tensor('images')
      ds.create_tensor('labels')

      # Iterate through the files and append to hub dataset
      for file in tqdm(file_names):
          label_text = os.path.basename(os.path.dirname(file))
          label_num = class_names.index(label_text)

          ds.images.append(cv2.cvtColor(cv2.imread(file), cv2.COLOR_BGR2RGB))  # Append to images tensor using cv2 imread
          ds.labels.append(np.uint32(label_num)) # Append to labels tensor

ds = create_hub_dataset(dataset_hub_path, file_names)
For this dataset, we can easily create two tensors: images and labels, and then populate them by going through the file_names, reading the images with cv2 and adding them to the tensor images, but we also read the label’s names and their index in the list class_names and add those in the tensor labels.

➡️ This execution time is a bit higher than the HDF5 dataset “one dataset per image” which was at 47.1463 seconds, and is similar to the time for the creation of the HDF5 dataset “organized in two datasets images and labels”.
Comparing incremental image loading from the datasets on local disk
Now we want to know how much time it takes to incrementally load 100 images — sequentially and randomly — on local disk, from the datasets we just created. We save these times in lists called hdf_time_seq_access, hdf_time_seq_access_img_label, and hub_time_seq_access for the sequential access, and in lists called hdf_time_random_access, hdf_time_random_access_img_label, and hub_time_random_access for the random access. Then we can easily visualize and compare them between each other:
Sequential Access
HDF5 format one dataset per image
  n_images_to_load = 100

  @timeit
  def hdf_load(k, hf):
      print([hf[str(i)] for i in range(k)])

  hdf_time_seq_access = []
  hf = h5py.File(f'./{dataset_h5_path}.h5', "r")

  # Sequential access 0 to 100 indexes
  for k in tqdm(range(n_images_to_load)):
    hdf_time_seq_access.append(hdf_load(k, hf)[1])
HDF5 format only two datasets: images and labels
  @timeit
  def hdf_load(k, hf):
      print([hf['images'][i] for i in range(k)])
      print([hf['labels'][i] for i in range(k)])

  hdf_time_seq_access_img_label = []
  hf = h5py.File(f'./{dataset_h5_images_labels_path}.h5', "r")

  # Sequential access 0 to 100 indexes
  for k in tqdm(range(n_images_to_load)):
    hdf_time_seq_access_img_label.append(hdf_load(k, hf)[1])
Hub format
  @timeit
  def hub_load(k, hf):
      print([ds.images[i] for i in range(k)])
      print([ds.labels[i] for i in range(k)])

  hub_time_seq_access = []
  ds = hub.load(dataset_hub_path)

  # Sequential access 0 to 100 indexes
  for k in tqdm(range(n_images_to_load)):
    hub_time_seq_access.append(hub_load(k, ds)[1])
Let’s visualize those times in a graph:
plt.plot(range(n_images_to_load), hub_time_seq_access, color='orange')
plt.plot(range(n_images_to_load), hdf_time_seq_access, color='blue')
plt.plot(range(n_images_to_load), hdf_time_seq_access_img_label, color='magenta')
plt.legend(['Hub with datasets images/labels', 'HDF', 'HDF with datasets images/labels'])

plt.xlabel('Number Reads')
plt.ylabel('Read time (ms)')
plt.title("Hub versus HDF vs HDF organized in two datasets on local disk -- sequential access")
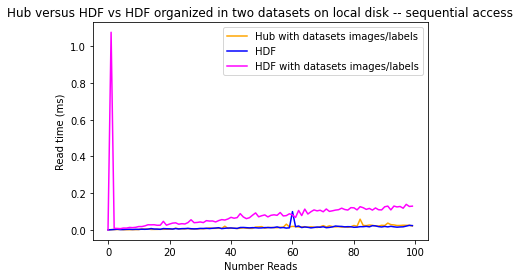
We see here that the incremental times taken to load images from the HDF5 dataset with datasets images/labels is increasing exponentially compared to the two others.
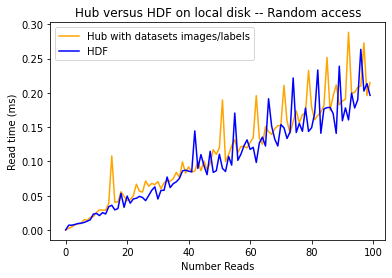
We remove this line from the plot so that we can see the comparison between Hub and HDF5 better:
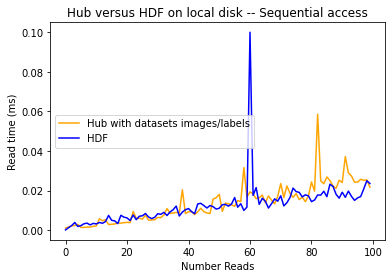
As you can see, Hub and HDF5 format have a pretty similar timing when incrementally reading images from the local disk sequentially.
Random Access case for Hub vs HDF5
Now let’s take a look at the random access case: instead of reading the images and labels at the indexes 0 to 100, we read 100 images which indexes are between 0 and 1000 with a step of 10 between each index. For this, we only need to replace the loop call in the previous functions:
for k in tqdm(range(n_images_to_load)):
is replace by:
for k in tqdm(range(0, 1000, 10)):
We also use different names for the lists as specified previously: hdf_time_random_access, hdf_time_random_access_img_label, hub_time_random_access.
With the same logic, we visualize the graphs of the executions times:
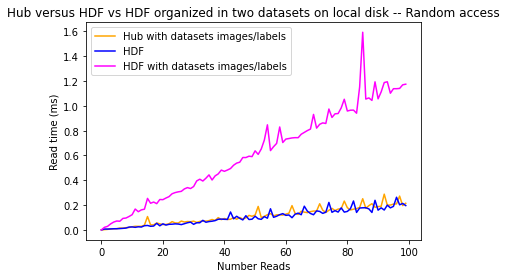
Once again, we see here that the execution times for the HDF organized in images/labels datasets keep increasing way more than when we load the images from the other datasets. And we also observe again that Hub and HDF5 have a pretty similar timing when incrementally reading images from the local disk randomly.
However, with the Hub dataset, we are actually also reading the label of the image, which is not the case with this HDF5 dataset.
Being able to save and load the labels and images quickly is an essential feature for a Deep Learning dataset’s tool. Once we have our Hub dataset that contains our images and labels, we can directly use it for training classification tasks for example, with either Pytorch or Tensorflow without writing any custom dataloader:
ds = hub.dataset('./dataset_path') # Hub Dataset

#PyTorch Dataloader
dataloader= ds.pytorch(batch_size = 16, num_workers = 2)

for data in dataloader:
    print(data)
    # Training Loop

#OR

#PyTorch Dataloader
dataloader= ds.tensorflow(batch_size = 16, num_workers = 2)

for data in dataloader:
    print(data)
    # Training Loop
This helps save even more of time!
HDF5 file format is one of the most popular and reliable formats. However, it is not optimized for deep learning tasks. Hub, on the contrary, is one of the HDF5 alternatives that provides a deep learning-native dataset format. It makes it easy to apply transformations to data in a parallel fashion, integrate with machine learning frameworks like Pytorch or Tensorflow or getting started with machine learning without the need to download entire huge datasets like Google Objectron. In all, creating computer vision datasets using the right format can make all the difference for a successful deep learning project.
](https://cdn-images-1.medium.com/max/2000/1*H0G4j1ahs-ymCjg6ZcHa9A.gif)
Now, try running code for yourself via this link to the Notebook for this tutorial.