


Summary
We built a tool that can generate artistic QR codes for a specific website/url with the use of Deep Lake, LangChain, Stable Diffusion and ControlNet via AUTOMATIC1111 and ComfyUI. If you want to try the code directly from our notebook, just download it from the repository.
Deep Lake is a Database for AI, designed to efficiently store and search large-scale AI data including audio, video or embeddings from text documents, which will also be utilized in this article. It offers unique storage optimization for deep learning applications, featuring data streaming, vector search, data versioning, and seamless integration with other popular frameworks such as LangChain. This comprehensive toolkit is designed to simplify the process of developing workflows of large language model (LLM), and in our case we will focus on its capability to summarize and answer questions from large-scale documents such as web pages.
Stable diffusion is a recent development in the field of image synthesis, with exciting potential for reducing high computational demand. It is primarily used for text-to-image generation, but is capable of variety of other tasks such as image modification, inpainting, outpainting, upscaling and generating image-to-image conditioned on text input. Meanwhile, ControlNet is an innovative neural network architecture that is a game-changer in managing the control of these diffusion models by integrating extra conditions. These control techniques include edge and line detection, human poses, image segmentation, depth maps, image styles or simple user scribbles. By applying these techniques, it is then possible to condition our output image with QR codes as well. In case you would be interested in more details, we recommend reading the original ControlNet article.
By combining all of this, we can achieve a scalable generation of QR codes that are very unique and more likely will attract attention. These are the steps that we are going to walk you through:
Steps
- Scraping the Content From a Website and Splitting It Into Documents
- Saving the Documents Along With Their Embeddings to Deep Lake
- Extracting the Most Relevant Documents
- Creating Prompts to Generate an Image Based on Documents
- Custom summary prompt + LLMChain
- QA retrieval + LLM
- Summarizing the Created Prompts
- Generating Simple QR From URL and inserting custom logo
- Generating Artistic QR Codes for Activeloop
- Txt2Img
- Content prompt
- Deep Lake prompt
- Img2Img with logo
- Content prompt
- Deep Lake prompt
- Txt2Img
- Generating Artistic QR Codes for E-commerce
- Img2Img with logo - Tommy Hilfiger
- Img2Img with logo - Patagonia
- Hands On with ComfyUI
- Limitations of Our Approach
- Conclusion
- FAQs
1# Install dependencies
2!pip install langchain deeplake openai qrcode apify_client tiktoken langchain-openai python-dotenv pydantic==1.10.8
3!apt install libzbar0
4!pip install qreader opencv-python
5
1import cv2
2import numpy as np
3import sys
4import time
5
6from langchain_community.vectorstores import DeepLake
7from langchain_openai import OpenAIEmbeddings
8from langchain.utilities import ApifyWrapper
9from langchain.text_splitter import CharacterTextSplitter
10#from langchain.document_loaders.base import Document
11from langchain.docstore.document import Document
12from langchain.chains import RetrievalQA
13from langchain_openai import OpenAI
14from langchain.chains import LLMChain
15from langchain import PromptTemplate
16import os
17from dotenv import load_dotenv
18
19load_dotenv()
20
21# Set API tokens
22os.environ['OPENAI_API_KEY'] = os.getenv('OPENAI_API_KEY')
23os.environ['ACTIVELOOP_TOKEN'] = os.getenv('ACTIVELOOP_TOKEN')
24os.environ["APIFY_API_TOKEN"] = os.getenv('APIFY_API_TOKEN')
25
Step 1: Scraping the Content From a Website and Splitting It Into Documents
First of all, we need to collect data that will be used as a content used to generate QR codes. Since the goal is to personalize it to a specific website, we provide a simple pipeline that can crawl data from a given URL. As an example, we use https://www.activeloop.ai/ from which we scraped 20 pages, but you could use any other website as long as it does not violate the Terms of Use. Or, if you wish to use other type of content, LangChain provide many other File loaders and Website loaders and you can personalize QR codes for them too!
1# We use crawler from ApifyWrapper(), which is available in Langchain
2# For convenience, we set 20 maximum pages to crawl with a timeout of 300 seconds.
3apify = ApifyWrapper()
4loader = apify.call_actor(
5 actor_id="apify/website-content-crawler",
6 run_input={"startUrls": [{"url": "https://www.activeloop.ai/"}], "maxCrawlPages": 20},
7 dataset_mapping_function=lambda item: Document(
8 page_content=item["text"] or "", metadata={"source": item["url"]}
9 ),
10 timeout_secs=300,
11)
12
13# Now the pages are loaded and split into chunks with a maximum size of 1000 tokens
14pages = loader.load()
15text_splitter = CharacterTextSplitter(chunk_size=1000, chunk_overlap=0, separator = ".")
16docs = text_splitter.split_documents(pages)
17docs
18
Step 2: Saving the Documents Along With Their Embeddings to Deep Lake
Once the website is scraped and pages are split into documents, it’s time to generate the embeddings and save them to the Deep Lake. This means that we can come back to our previously scraped data at any time and don’t need to recalculate the embeddings again. To do that, you need to set your ACTIVELOOP_ORGANIZATION_ID.
1activeloop_org = "YOUR_ACTIVELOOP_ORG_ID"
2# initialize the embedding model
3embeddings = OpenAIEmbeddings()
4
5# initialize the database, can also be used to load the database
6db = DeepLake(
7 dataset_path=f"hub://{activeloop_org}/scraped-websites",
8 embedding=embeddings,
9 overwrite=False,
10)
11
12# save the documents
13db.add_documents(docs)
14
Step 3: Extracting the Most Relevant Documents
Since we want to generate an image in the context of the given website that can have hundreds of pages, it is useful to filter documents that are the most relevant for our query, in order to save money on chained API calls to LLM. For this, we are going to leverage Deep Lake Vector Store similarity search as well as retrieval functionality.
To pre-filter the documents based on a query, choose the query that works best for you based on the type of information you have scraped from the internet
1query_for_company = 'Business core of the company'
2
3result = db.similarity_search(query_for_company, k=10)
4result
5
For question-answering pipeline, we can then define the retriever
1retriever = db.as_retriever(
2 search_kwargs={"k":10}
3)
4
Step 4: Creating Prompts to Generate an Image Based on Documents
The goal is to understand the content and generate prompts in an automated way, so that the process can be scalable. We start by initializing the LLM with a default gpt-3.5-turbo-instruct model and set medium temperature to introduce some randomness.
1# Initialize LLM
2llm = OpenAI(temperature=0.5)
3
One of many advantages of LangChain are also prompt templates, which significantly help with clarity and readability. To make the output description more precise, we should also provide examples as can be seen here.
1query = "You are a prompt generator. Based on the content, write a detailed one sentence description that can be used to generate an image"
2
3prompt_template = """{query}:
4
5Content: {text}
6"""
7
8# set the prompt template
9PROMPT = PromptTemplate(
10 template=prompt_template,
11 input_variables=["text"],
12 partial_variables={"query": query}
13)
14
The query is used to indicate some information we expect to output, text is the content provided to LLM, whereby it is supposed to provide a detailed description of the image. Additionally, to have more control over the output, we also create an alternative prompt that can generate a specific image type.
Using this, we then experimented with 2 following approaches, that differ in what kind of text is provided.
Option 1: Custom Summary Prompt with LLMChain
The idea is simple, we chain the description prompt on each filtered document and then apply it once again on the summarized descriptions. In other words, text will be a variable that is iterated during LMMChain operation.
1# Initialize the chain
2chain = LLMChain(llm=llm, prompt=PROMPT)
3
4# Filter the most relevant documents
5result = db.similarity_search(query_for_company, k=10)
6# Run the Chain
7image_prompt = chain.invoke(result)
8image_prompt = image_prompt["text"]
9image_prompt
10
Option 2: Retrieval Question-Answering with LLM
Here we initialize QA retriever, which will allow us to ask to explain a particular concept on the filtered documents.
1qa = RetrievalQA.from_chain_type(
2 llm=llm,
3 chain_type='stuff',
4 retriever=retriever
5)
6
7chain_answer = qa.invoke("Explain what is Deep Lake")
8chain_answer
9
The answer is then used as text in the PromptTemplate without the need for any chain.
1answer = llm(prompt=PROMPT.format(text=answer))
2answer
3
Step 5: Summarizing the Created Prompts
We experimented with different prompt setups in the previous section, and yet there is more to explore. In case you would be interested in perfectionizing your LLM prompts even further, we have an amazing course that will provide you many useful tips and tricks. Mastering prompts for image generation is, however, more art than science. Nevertheless, by providing the LLM with examples we can see that it can do a pretty good job by generating very specific image descriptions. Here are 3 different types of prompts that we were able to generate with our approach:
1. Content Prompt
This prompt summarizes all relevant documents scraped from Activeloop into a general but detailed image description: `high-tech, futuristic, AI-driven, advanced, complex, computer-generated, robot, machine learning, data visualization, interactive, cutting-edge technology, automation, precision, efficiency, innovation, digital transformation, smart technology, science fiction-inspired.
2. Deep Lake Prompt
Here we show a Question-Answering example with a detailed image description of Deep Lake: `An aerial view of a serene, glassy lake surrounded by trees and mountains, with giant blocks of data floating on the surface, each block representing a different data type such as images, videos, audio, and tabular data, all stored as tensors, while a team of data scientists in a nearby cabin focus on their work to build advanced deep learning models, powered by GPUs that are seamlessly integrated with Deep Lake.
Step 6: Generating Simple QR From URL and Inserting Custom Logo
Before we generate the art, it is important to prepare the simple QR code for ControlNet, which can be created directly from Python code. It is important to set the error correction level to 'H’, which increases the probability of QR being readable, as 30% of the code can be covered/destroyed by an image. To generate a QR code with a logo, we created a function that takes the logo image and places it on the previously generated QR code. It is also important to note, that some of the URLs might be too long to generate a QR that is not too complicated and reliable enough for scanning. For this purpose, we can use url shorteners such as bit.ly.
1import qrcode
2from PIL import Image
3
4def create_qrcode(url:str):
5 QRcode = qrcode.QRCode(
6 error_correction=qrcode.constants.ERROR_CORRECT_H
7 )
8
9 # taking url or text
10 url = 'https://www.activeloop.com/'
11
12 # adding URL or text to QRcode
13 QRcode.add_data(url)
14
15 # adding color to QR code
16 QRimg = QRcode.make_image(
17 back_color="white").convert('RGB')
18 return QRimg
19
20def qr_with_logo(logo_path: str, QRimg: Image.Image, output_image_name: str):
21 logo = Image.open(logo_path)
22
23 # taking base width
24 basewidth = 100
25
26 # adjust image size
27 wpercent = (basewidth/float(logo.size[0]))
28 hsize = int((float(logo.size[1])*float(wpercent)))
29 logo = logo.resize((basewidth, hsize))
30
31 # set size of QR code
32 pos = ((QRimg.size[0] - logo.size[0]) // 2,
33 (QRimg.size[1] - logo.size[1]) // 2)
34 QRimg.paste(logo, pos)
35
36 # save the QR code generated
37 QRimg.save(output_image_name)
38 return QRimg
39
Step 7: Generating Artistic QR Codes for Activeloop
First of all, we need to keep in mind that it is still very fresh and unexplored topic and the more pleasing-looking QRs you want to generate, the higher risk of not being readable by a scanner. This results in an endless cycle of adjusting parameters to find the most general setup. Many approaches can be applied, but their main difference is in ControlNet units. The highest success we had was with brightness and tile preprocessors, as well as the qrcode preprocessor. Sometimes, adding a depth preprocessor was also helpful. A great guide on how to set up the Stable-diffusion webui with ControlNet extension to generate your first QR codes can be found for example here. Nevertheless, there is no single setup that would work 100% of the time and a lot of experimenting is needed, especially in terms of finetuning the control’s strength/start/end to achieve a desirable output.
For example, in most of the QR codes we used the following setup:
- Negative prompt: ugly, disfigured, low quality, blurry, nsfw
- Steps: 20
- Sampler: DPM++ 2M Karras
- CFG scale: 9
- Size: 768x768
- Model: dreamshaper_631BakedVae
- ControlNet
- 0: preprocessor: none, model: control_v1p_sd15_qrcode, weight: 1.1, starting/ending: (0, 1), resize mode: Crop and Resize, pixel perfect: False, control mode: Balanced
- 1: preprocessor: none, model: control_v1p_sd15_brightness, weight: 0.3, starting/ending: (0, 1), resize mode: Crop and Resize, pixel perfect: False, control mode: Balanced
In case of Img2Img, we would also need to put an inpaint mask to disable any changes to the logo.
Download and Run AUTOMATIC1111
In order to play with this interface you have to clone the official repository in you workspace and double click the webui-user.bat file.
1!git clone https://github.com/AUTOMATIC1111/stable-diffusion-webui
2
Integrate ControlNet in AUTOMATIC1111
If you want to install ControlNet you must follow the istructions given in the official repository:
- Open “Extensions” tab.
- Open “Install from URL” tab in the tab.
- Enter https://github.com/Mikubill/sd-webui-controlnet.git to "URL for extension’s git repository".
- Press “Install” button.
- Wait for 5 seconds, and you will see the message "Installed into stable-diffusion-webui\extensions\sd-webui-controlnet. Use Installed tab to restart".
- Go to “Installed” tab, click "Check for updates", and then click "Apply and restart UI". (The next time you can also use these buttons to update ControlNet.)
- Completely restart A1111 webui including your terminal. (If you do not know what is a "terminal", you can reboot your computer to achieve the same effect.)
- Download models (see below).
- After you put models in the correct folder, you may need to refresh to see the models. The refresh button is right to your “Model” dropdown.
If you visit the official page of AUTOMATIC1111, you can see the interface from which you can select the settings you prefer.
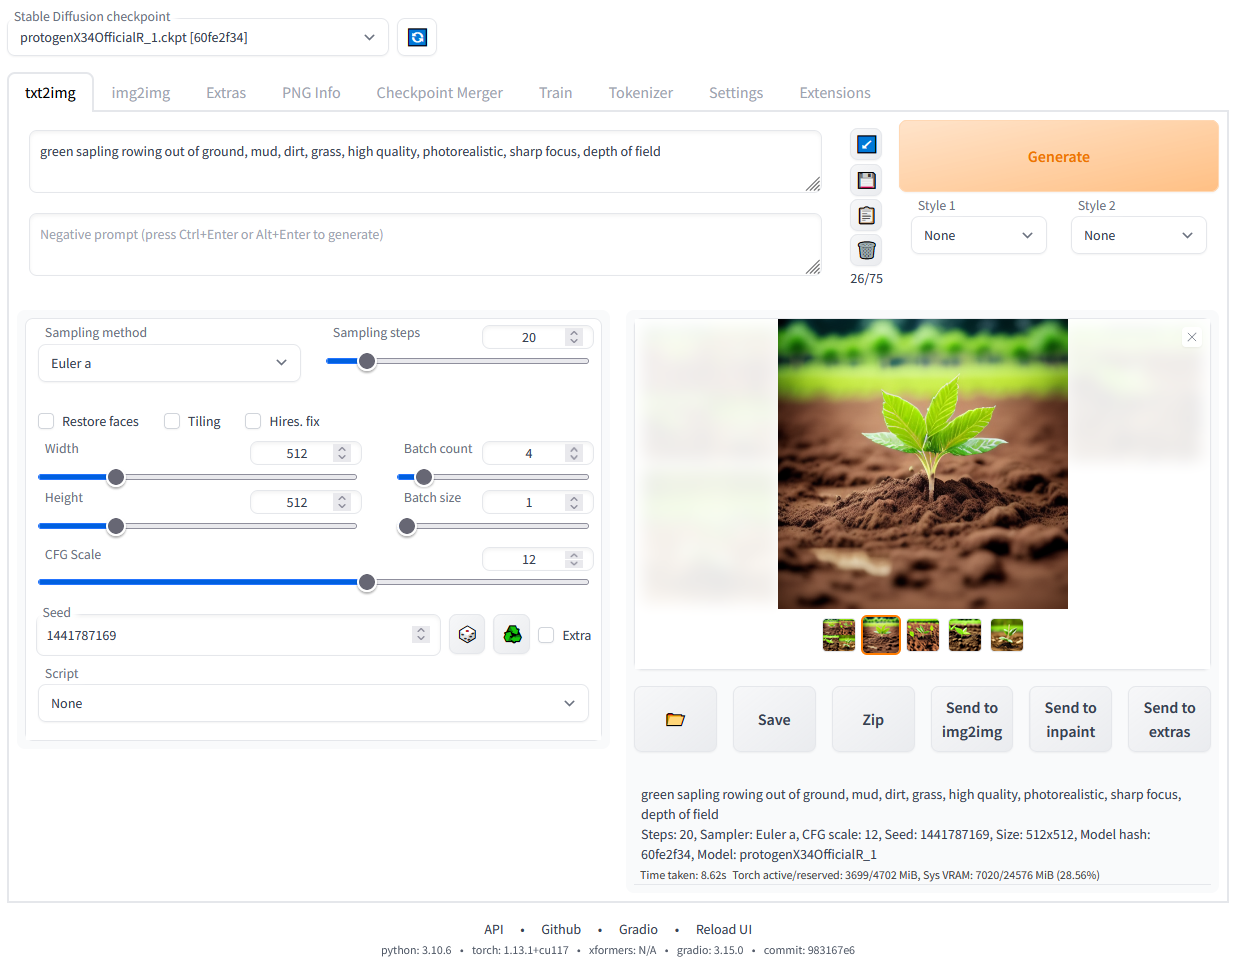
In the above part you can choose what type of task to perform txt2img, img2img and so on, in the middle part of the interface there are settings you can change. If you install the controlnet plugin you will be able to find all the configurations that will allow you to control how much the impact of ControlNet will weigh on the final result.


Txt2Img - Generating QR Code From a Simple QR and Previously Created Prompt
Content prompt
 |  |
 |  |
Deep Lake prompt
 |  |
 |  |
Img2Img with logo - Generating QR Code From a QR with Logo and Previously Created Prompt
Content prompt
 |  |
 |  |
Deep Lake prompt
 |  |
 |  |
Step 8: Generating Artistic QR Codes for E-commerce
The idea here is a little different compared to the previous examples in context of Activeloop.
Now, we focus on product advertising and we want to generate a QR code only for a single URL and its product. The challenge is to generate QR code, while also keeping the product as similar to the original as possible to avoid misleading information. To do this, we experimented with many preprocessors such as the tile, depth, reference_only, lineart or styles, but we found most of them too unreliable and far from being similar to the original input. At this moment, we believe that the most useful is the tile preprocessor, which can preserve a lot of information. The disadvantage is, however, that it does not allow for many changes during control phase and the QR fit can sometimes be questionable. In practice, this would be done by adding another CotntrolNet unit:
- 2: preprocessor: none, model: control_v11f1e_sd15_tile, weight: 1.0, starting/ending: (0, 1), resize mode: Crop and Resize, pixel perfect: False, control mode: Balanced
Since thetileinput image control is very strong, theres not much else we can do. Styles are one of the little extra adjustments possible and very useful style cheat sheet can be found here. For our purposes, however, we did not end up utilizing any of them.
Similarly as before, we generated prompts automaticaly from the given websites. We randomly selected 2 products and in the first case (Tommy Hilfiger) We added logo to the initial basic QR code while in the second case (Patagonia), we only mask the logo that is already present on the product. To see the comparison, we also provide the original input images (Sources: Patagonia, Tommy Hilfiger).
Img2Img with Logo - Generating Tommy Hilfiger QR Code
 |  |
 |  |
Img2Img with logo - Generating Patagonia QR Code
 |  |
 |  |
Step 9: Hands On with ComfyUI
A different approach from the one listed above can be obtained by taking advantage of ComfyUI which is a powerful and modular stable diffusion GUI.
The main idea is to create a schema from the proposed GUI and transform this schema into code thanks to an extension called ComfyUI-to-Python-Extension.
We need to load the Stable Diffusion and the ControlNet checkpoints we want to use.
In our case we experimented with:
- Diffusion models:
v1-5-pruned-emaonly,dreamshaper_8andrevAnimated_v122EOL - ControlNet models:
control_v1p_sd15_brightness,control_v1p_sd15_qrcode,control_v11f1e_sd15_tileandcontrol_v11f1p_sd15_depth.
Install ComfyUI
1!git clone https://github.com/comfyanonymous/ComfyUI.git
2%cd ComfyUI
3!pip install -r requirements.txt
4
Add the ComfyUI plugin to transform the schema into code
1!git clone https://github.com/pydn/ComfyUI-to-Python-Extension.git
2%cd ComfyUI-to-Python-Extension
3!pip install -r requirements.txt
4
Download all the checkpoints in the right folder
1!wget https://github.com/efenocchi/QRCodeGenerator/blob/main/3_workflow_qr_codes2.json https://github.com/efenocchi/QRCodeGenerator/blob/main/2_workflow_qr_codes.json -P /content/ComfyUI/ComfyUI-to-Python-Extension
2!wget https://github.com/efenocchi/QRCodeGenerator/blob/main/workflow_api.py -P /content/ComfyUI/ComfyUI-to-Python-Extension
3!wget https://huggingface.co/stabilityai/sd-vae-ft-mse-original/resolve/main/vae-ft-mse-840000-ema-pruned.safetensors -P /content/ComfyUI/models/vae
4!wget https://huggingface.co/lllyasviel/ControlNet-v1-1/resolve/main/control_v11f1p_sd15_depth.pth -P /content/ComfyUI/models/controlnet
5!wget https://huggingface.co/latentcat/latentcat-controlnet/resolve/main/models/control_v1p_sd15_brightness.safetensors -P /content/ComfyUI/models/controlnet
6!wget https://huggingface.co/lllyasviel/ControlNet-v1-1/resolve/main/control_v11f1e_sd15_tile.pth -P /content/ComfyUI/models/controlnet
7!wget https://huggingface.co/autismanon/modeldump/resolve/main/dreamshaper_8.safetensors -P /content/ComfyUI/models/checkpoints
8!wget https://civitai.com/api/download/models/46846?type=Model&format=SafeTensor&size=full&fp=fp32 -P /content/ComfyUI/models/checkpoints
9
If you have problems downloading the model from CivitAI try downloading it manually after logging in or download it directly from Hugging Face, in this last case remember to pay attention to choosing the right name when loading the model in the following steps.
1# !wget https://huggingface.co/emmajoanne/models/resolve/main/revAnimated_v122.safetensors -P /content/ComfyUI/models/checkpoints
2
Run the Comfyui GUI.
If you encounter problems, run this command from the terminal. For advice and error resolution, refer to the official repository.
Since this is not a ComfyUI guide and some things may not be clear, if you want to know more, consult the official repository or some free guides like this one.
This command has been put for informational purposes only, to proceed with image generation you will not need to create the scheme from scratch with ComfyUI but directly execute the cells shown below.
1#!python main.py
2
Below will be shown one of the schemes used, it is composed by 1 Diffusion model called v1-5-pruned-emaonly and 3 different controlnet models control_v1p_sd15_brightness and control_v11f1e_sd15_tile.

As illustrated, the QR Code was generated by combining the basic QR Code image with a textual input, making it easy to merge the initial image with the generated one. In this case the positive prompt was simply “a cyborg character” and the negative one "ugly, artefacts, bad". This pipeline produced the images shown below:
 |  |
 |  |
To export the schema and transform it to python code you must follow some different step:
- Enable Dev mode Options: you need to click on the settings button (located above to the Queue Prompt text in the window that will appear when you activate ComfyUI) and select the “Enable Dev mode Options” box.
- Export the schema via the button "Save (API Format)"
- Put this schema in the ComfyUI-to-Python-Extension folder
- Run the python file
comfyui_to_python.py
As with the previous command, this explanation has also been made for informational purposes only, to proceed with image generation you will not need to create the scheme from scratch with ComfyUI and convert it into python code because this step has already been done by me.
The following functions are used to create the QR code from a text and to load a logo in the center of it:
Go to the main ComfyUI folder:
1# if you are in Colab you can simply run
2# % cd /content/ComfyUI
3%cd ..
4!ls
5
6img = create_qrcode('https://www.activeloop.com/')
7img.save("activeloop_qr.jpg")
8img_with_logo = qr_with_logo("activeloop_logo.jpg", img, "activeloop_qr_with_logo.jpg")
9img_with_logo
10
11
Set the correct path to be able to work with ComfyUI
1import os
2import random
3import sys
4from typing import Sequence, Mapping, Any, Union
5import torch
6
7def get_value_at_index(obj: Union[Sequence, Mapping], index: int) -> Any:
8 """Returns the value at the given index of a sequence or mapping.
9 If the object is a sequence (like list or string), returns the value at the given index.
10 If the object is a mapping (like a dictionary), returns the value at the index-th key.
11
12 Some return a dictionary, in these cases, we look for the "results" key
13 """
14 try:
15 return obj[index]
16 except KeyError:
17 return obj["result"][index]
18
19def find_path(name: str, path: str = None) -> str:
20 """
21 Recursively looks at parent folders starting from the given path until it finds the given name.
22 Returns the path as a Path object if found, or None otherwise.
23 """
24 # If no path is given, use the current working directory
25 if path is None:
26 path = os.getcwd()
27
28 # Check if the current directory contains the name
29 if name in os.listdir(path):
30 path_name = os.path.join(path, name)
31 print(f"{name} found: {path_name}")
32 return path_name
33
34 # Get the parent directory
35 parent_directory = os.path.dirname(path)
36
37 # If the parent directory is the same as the current directory, we've reached the root and stop the search
38 if parent_directory == path:
39 return None
40
41 # Recursively call the function with the parent directory
42 return find_path(name, parent_directory)
43
44def add_comfyui_directory_to_sys_path() -> None:
45 """
46 Add 'ComfyUI' to the sys.path
47 """
48 comfyui_path = find_path("ComfyUI")
49 if comfyui_path is not None and os.path.isdir(comfyui_path):
50 sys.path.append(comfyui_path)
51 print(f"'{comfyui_path}' added to sys.path")
52
53add_comfyui_directory_to_sys_path()
54
Upload all the models that you will need during the generation phase, in this case we will need a model to generate the image starting from the text and another 2-3 models to integrate the generated image into the image of our QR code
1from nodes import (
2 KSampler,
3 CLIPTextEncode,
4 ControlNetApplyAdvanced,
5 VAEDecode,
6 CheckpointLoaderSimple,
7 LoadImage,
8 ControlNetLoader,
9 NODE_CLASS_MAPPINGS,
10 EmptyLatentImage,
11 VAELoader,
12 SaveImage,
13)
14controlnetapplyadvanced = ControlNetApplyAdvanced()
15ksampler = KSampler()
16vaedecode = VAEDecode()
17saveimage = SaveImage()
18vaeloader = VAELoader()
19
20def load_checkpoints(diffuser_model:str = "dreamshaper_8.safetensors", controlnet_1:str = "control_v11f1e_sd15_tile.pth", controlnet_2: str = "control_v1p_sd15_brightness.safetensors", controlnet_3: str = None):
21 with torch.inference_mode():
22
23 checkpointloadersimple = CheckpointLoaderSimple()
24 checkpointloadersimple_4 = checkpointloadersimple.load_checkpoint(
25 ckpt_name=diffuser_model
26 )
27 emptylatentimage = EmptyLatentImage()
28 emptylatentimage_5 = emptylatentimage.generate(
29 width=768, height=768, batch_size=4
30 )
31 controlnetloader = ControlNetLoader()
32 controlnetloader_10 = controlnetloader.load_controlnet(
33 control_net_name=controlnet_1
34 )
35
36 controlnetloader_11 = controlnetloader.load_controlnet(
37 control_net_name=controlnet_2
38 )
39 controlnetloader_12 = None
40 if controlnet_3 is not None:
41 controlnetloader_12 = controlnetloader.load_controlnet(
42 control_net_name=controlnet_3
43 )
44 vaeloader_24 = vaeloader.load_vae(
45 vae_name="vae-ft-mse-840000-ema-pruned.safetensors"
46 )
47 return checkpointloadersimple_4, emptylatentimage_5, controlnetloader_10, controlnetloader_11, controlnetloader_12, vaeloader_24
48
Choose which models to use, pass the same name as the models in the “checkpoints” and “controlnet” folders. You can decide whether to use two controlnets or three, passing the filenames for controlnet_1 and controlnet_2 or controlnet_1, controlnet_2 and controlnet_3. By default only two are used.
1checkpointloadersimple_4, emptylatentimage_5, controlnetloader_10, controlnetloader_11, controlnetloader_12, vaeloader_24 = load_checkpoints()
2
Load the CLIP templates which, given the texts, will allow you to choose which image to generate and which effects to avoid
1
2def load_text_and_image(prompt_text:str = None, prompt_text_negative:str = None, input_image_path: str = None):
3 torch.device("cuda" if torch.cuda.is_available() else "cpu")
4
5 with torch.inference_mode():
6
7 cliptextencode = CLIPTextEncode()
8 cliptextencode_6 = cliptextencode.encode(
9 text=prompt_text, clip=get_value_at_index(checkpointloadersimple_4, 1)
10 )
11
12 cliptextencode_7 = cliptextencode.encode(
13 text=prompt_text_negative,
14 clip=get_value_at_index(checkpointloadersimple_4, 1),
15 )
16
17 loadimage = LoadImage()
18 loadimage_14 = loadimage.load_image(image=input_image_path)
19
20 return cliptextencode_6, cliptextencode_7, loadimage_14
21
This is the heart of the generation and allows you to choose the values to attribute to the different controlnets, if you want to play with the ou to choose theparameters and see how the result varies as they vary, you can go to the custom values variable or modify the start_percent and end_percent values directly in the models.
strength: strength of controlnet; 1.0 is full strength, 0.0 is no effect at all.start_percent: sampling step percentage at which controlnet should start to be applied - no matter what start_percent is set on timestep keyframes, they won’t take effect until this start_percent is reached.stop_percent: sampling step percentage at which controlnet should stop being applied - no matter what start_percent is set on timestep keyframes, they won’t take effect once this end_percent is reached.
1def run_inference(cliptextencode_6, cliptextencode_7, loadimage_14, tile_controlnet_values: float=0.5, brightness_controlnet_values: float = 0.35, depth_controlnet_values: float = 1.0, number_of_examples=3):
2 with torch.inference_mode():
3 for _ in range(number_of_examples):
4 controlnetapplyadvanced_28 = controlnetapplyadvanced.apply_controlnet(
5 strength=tile_controlnet_values,
6 start_percent=0.35,
7 end_percent=0.6,
8 positive=get_value_at_index(cliptextencode_6, 0),
9 negative=get_value_at_index(cliptextencode_7, 0),
10 control_net=get_value_at_index(controlnetloader_10, 0),
11 image=get_value_at_index(loadimage_14, 0),
12 )
13
14 controlnetapplyadvanced_27 = controlnetapplyadvanced.apply_controlnet(
15 strength=brightness_controlnet_values,
16 start_percent=0,
17 end_percent=1,
18 positive=get_value_at_index(controlnetapplyadvanced_28, 0),
19 negative=get_value_at_index(controlnetapplyadvanced_28, 1),
20 control_net=get_value_at_index(controlnetloader_11, 0),
21 image=get_value_at_index(loadimage_14, 0),
22 )
23 controlnetapplyadvanced_26 = None
24 if controlnetloader_12 is not None:
25 controlnetapplyadvanced_26 = controlnetapplyadvanced.apply_controlnet(
26 strength=depth_controlnet_values,
27 start_percent=0,
28 end_percent=0.2,
29 positive=get_value_at_index(controlnetapplyadvanced_27, 0),
30 negative=get_value_at_index(controlnetapplyadvanced_27, 1),
31 control_net=get_value_at_index(controlnetloader_12, 0),
32 image=get_value_at_index(loadimage_14, 0),
33 )
34
35 if controlnetapplyadvanced_26 is not None:
36 ksampler_17 = ksampler.sample(
37 seed=random.randint(1, 2**64),
38 steps=20,
39 cfg=8,
40 sampler_name="euler",
41 scheduler="normal",
42 denoise=1,
43 model=get_value_at_index(checkpointloadersimple_4, 0),
44 positive=get_value_at_index(controlnetapplyadvanced_26, 0),
45 negative=get_value_at_index(controlnetapplyadvanced_26, 1),
46 latent_image=get_value_at_index(emptylatentimage_5, 0),
47 )
48 else:
49 ksampler_17 = ksampler.sample(
50 seed=random.randint(1, 2**64),
51 steps=20,
52 cfg=8,
53 sampler_name="euler",
54 scheduler="normal",
55 denoise=1,
56 model=get_value_at_index(checkpointloadersimple_4, 0),
57 positive=get_value_at_index(controlnetapplyadvanced_27, 0),
58 negative=get_value_at_index(controlnetapplyadvanced_27, 1),
59 latent_image=get_value_at_index(emptylatentimage_5, 0),
60 )
61
62 vaedecode_18 = vaedecode.decode(
63 samples=get_value_at_index(ksampler_17, 0),
64 vae=get_value_at_index(vaeloader_24, 0),
65 )
66
67 saveimage_29 = saveimage.save_images(
68 filename_prefix="ComfyUI", images=get_value_at_index(vaedecode_18, 0)
69 )
70
1%cd ComfyUI
2# IF YOU ARE IN COLAB COULD BE QUICKER TO USE THE FOLLOWING PATH
3#OUTPUT_DIR = "/content/ComfyUI/output/"
4#OUTPUT_DIR_NR = "/content/ComfyUI/output/non_readable/"
5
6# IF YOU ARE NOT IN COLAB
7OUTPUT_DIR = "output/"
8OUTPUT_DIR_NR = "output/non_readable/"
9
10os.makedirs(OUTPUT_DIR_NR, exist_ok = True)
11
Choose the prompt from the first step based on your chosen company, or write a prompt from scratch
1print(image_prompt)
2print(chain_answer)
3print(answer)
4
1prompt_text = "a Deep Lake in the forest"
2prompt_text_negative = "ugly, bad, artifacts"
3# must be in the ComfyUI/input/ folder
4input_image_path = "activeloop_qr.jpg"
5
6cliptextencode_6, cliptextencode_7, loadimage_14 = load_text_and_image(prompt_text, prompt_text_negative, input_image_path)
7
Run the inference function and check the generated images in the output folder
1run_inference(cliptextencode_6, cliptextencode_7, loadimage_14, tile_controlnet_values=0.5, brightness_controlnet_values=0.35, depth_controlnet_values=1.0, number_of_examples=1)
2
Depending on the CheckpointLoaderSimple model loaded (see load_checkpoints function), you will get different results with the same prompt.
Here, for example, we have done different tests with different models and we can see that with the same prompt some models generate images rich in details while others generate a QR code that is little different from the original. This makes us understand that the prompts we write are bound to the chosen model.
With v1-5-pruned-emaonly.safetensors
 |  |
 |  |
With dreamshaper_8.safetensors
 |  |
 |  |
With revAnimated_v122EOL.safetensors
 |  |
 |  |
Keep only truly scannable QR codes
1import os
2from qreader import QReader
3import cv2
4import shutil
5from PIL import Image
6qreader = QReader()
7
8def keep_readable_qrcodes(folder):
9 images = []
10 for filename in os.listdir(folder):
11 path = folder + filename
12 img = cv2.imread(folder + filename)
13
14 if img is not None:
15 decoded_text = qreader.detect_and_decode(image=img)
16 if decoded_text:
17 print(decoded_text)
18 else:
19 print(f"non readable: {filename}")
20 shutil.move(path, OUTPUT_DIR_NR + filename)
21
22 return images
23
1#images = keep_readable_qrcodes("/content/ComfyUI/output")
2keep_readable_qrcodes(OUTPUT_DIR)
3
Apply logo to generated images to make them more intriguing
1generated_image = Image.open("<YOUR_GENERATED_IMAGE_PATH>")
2img_with_logo = qr_with_logo("activeloop_logo.jpg", generated_image, "generated_image_with_logo.jpg")
3img_with_logo
4
Limitations of Our Approach
Overall, the ControlNet model required extensive manual tuning of parameters. There are many methods to control the QR code generation process, but none are entirely reliable. The problem intensifies when you want to account for the input product image as well.
Adding an image to the input might offer more control and bring about various use-cases, but it significantly restricts the possibilities of stable diffusion. This usually only results in changes to the image’s style without fitting much of the QR structure. Moreover, we saw greater success with text-to-image compared to image-to-image with logo masks. However, the former wasn’t as desirable because we believe logos are essential in product QR codes.
From our examples, it’s evident that the generated products don’t exactly match the actual products one-to-one. If the goal is to advertise a specific product, even a minor mismatch could be misleading. Nonetheless, we believe that LoRA models or a different type of preprocessor model could address these issues.
Automated image prompts can sometimes be confusing, drawing focus to unimportant details within the context. This is particularly problematic if we don’t have enough relevant textual information to build upon. This presents an opportunity to further use the Deep Lake Vector Store to analyze the image bind embeddings for a better understanding of the content on e-commerce websites.
Conclusion: Scalable Prompt Generation Achieved, QR Code Generation Remains Unreliable
Deep Lake combined with LangChain can significantly reduce the costs of analyzing the contents of a website to provide image descriptions in a scalable way. Thanks to the Deep Lake Vector Store, we can save a large number of documents and images along with their embeddings. This allows us to iteratively adjust the image prompts and efficiently filter based on embedding similarities. Taking into account all of the limitations we’ve discussed, we believe that there needs to be more experimenting with ControlNet, in order to generated product QR codes that are reliable and applicable for real-world businesses. The choice of checkpoint remains very important and must be made based on the specific use case for which it is being generated.
I hope that you find this useful and already have many ideas on how to further build on this. Thank you for reading and I wish you a great day and see you in the next one.
FAQs
What is prompt engineering?
Prompt engineering is the practice of carefully crafting inputs (prompts) to be given to AI models, particularly language models, in order to elicit the desired output. It involves understanding how the model interprets inputs and using that knowledge to achieve more accurate, relevant, or creative responses.
What is Stable Diffusion?
Stable Diffusion refers to a specific generative artificial intelligence model designed for text-to-image synthesis. This model has the capability to generate photorealistic images based on textual input. It empowers users to create stunning artwork quickly and autonomously. Additionally, besides images, Stable Diffusion can also be used for image-to-image generation or to create videos and animations. It was originally launched in 2022.
Is Stable Diffusion free to use?
Stable Diffusion is an open-source project, which means it is freely available for anyone to use. You can access and use Stable Diffusion without any cost, subject to the terms of its open-source license.
What is ControlNet?
ControlNet is an innovative neural network architecture that integrates extra conditions to manage the control of diffusion models. These techniques include edge and line detection, human poses, image segmentation, depth maps, image styles, or simple user scribbles, allowing for conditioned output images.
What is AUTOMATIC1111?
AUTOMATIC1111 is a robust web-based user interface (WebUI) tailored for Stable Diffusion, an AI model for text-to-image generation. It provides an intuitive platform for creating remarkable images from textual prompts.
How to use ComfyUI?
ComfyUI is a powerful and modular stable diffusion GUI. To use it, you need to clone the ComfyUI repository, install its requirements, and run the main.py file. It allows for the creation of schemas from the GUI and transforms these schemas into code for image generation tasks.
What is QR code and how it works?
A QR code, or Quick Response code, is a two-dimensional barcode that stores data. It works by encoding information in black squares arranged on a white grid. When scanned by a QR code reader or smartphone camera, the encoded data is decoded and can trigger actions such as opening a website or displaying text.
How to make artistic QR codes?
Making artistic QR codes involves incorporating design elements, colors, and sometimes logos into the QR code without compromising its scan-ability. This can be achieved through specialized software or online tools that allow for the customization of QR codes while ensuring they remain functional.
What is image synthesis?
Image synthesis is the process of generating new images from textual descriptions, existing images, or a combination of both, using artificial intelligence and machine learning models. It involves creating visually coherent and contextually relevant images based on the input provided.
What are LoRA models?
LoRA (Low-Rank Adaptation of Large Language Models) is a popular and lightweight training technique that significantly reduces the number of trainable parameters. It works by inserting a smaller number of new weights into the model and only these are trained. In the context of AI and machine learning, particularly concerning stable diffusion models, LoRA models are mentioned as potentially useful for addressing issues in generating product QR codes that match actual products more closely.